History of Spring Framework and Spring Boot

Introduction

Spring framework is arguably one of the most popular application development frameworks used by java developers. It currently consists of a large number of modules providing a range of services. These include a component container, aspect oriented programming support for building cross cutting concerns, security framework, data access framework, web application framework and support classes for testing components. All the components of the spring framework are glued together by the dependency injection architecture pattern. Dependency injection(also known as inversion of control) makes it easy to design and test loosely coupled software components. The current version of spring framework is 4.3.x and the next major version 5.0 is scheduled for release in the fourth quarter of 2017.

Over years spring framework has grown substantially. Almost all infrastructural software components required by a java enterprise application is now available in spring framework. However collecting all the required spring components together and configuring them in a new application requires some effort. This involves setting up library dependencies in gradle/maven and then configuring the required spring beans using xml, annotations or java code. Spring developers soon realized that it is possible to automate much of this work. Enter spring boot!

Spring boot takes an opinionated view of building spring applications. What this means is that for each of the major use cases of spring, spring boot defines a set of default component dependencies and automatic configuration of components. Spring boot achieves this using a set of starter projects. Want to be build a spring web application? Just add the dependency on spring-boot-starter-web! Want to use spring email libraries? Just add the dependency on spring-boot-starter-mail! Spring boot also has some cool features such as embedded application server(jetty/tomcat),  a command line interface based on groovy and health/metrics monitoring.

Spring boot enables java developers to quickly start a new project with all the required spring framework components. This article looks at how spring framework and spring boot has become the de facto leader in java based microservice application development from its humble beginnings in 2002. If you don't have time, you may want to check out the spring timeline infographic.

History of Spring Framework

The Beginnings

In October 2002, Rod Johnson wrote a book titled Expert One-on-One J2EE Design and Development. Published by Wrox, this book covered the state of Java enterprise application development at the time and pointed out a number of major deficiencies with Java EE and EJB component framework. In the book he proposed a simpler solution based on ordinary java classes (POJO - plain old java objects) and dependency injection. Following is an excerpt from the book,

The centralization of workflow logic into the abstract superclass is an example of inversion of control. Unlike in traditional class libraries, where user code invokes library code, in this approach framework code in the superclass invokes user code. It's also known as the Hollywood principle: "Don't call me, I'll call you". Inversion of control is fundamental to frameworks, which tend to use the Template Method pattern heavily(we'll discuss frameworks later).

In the book, he showed how a high quality, scalable online seat reservation application can be built without using EJB. For building the application, he wrote over 30,000 lines of infrastructure code! It included a number of reusable java interfaces and classes such as ApplicationContext and BeanFactory. Since java interfaces were the basic building blocks of dependency injection, he named the root package of the classes as com.interface21. As Rod himself explained later, 21 in the name is a reference to 21st century!

One-on-One J2EE Design and Development was an instant hit. Much of the infrastructure code freely provided as part of the book was highly reusable and soon a number of developers started using it in their projects. Wrox had a webpage for the book with source code and errata. They also provided an online forum for the book. Interestingly even after 15 years, this book and its principles are still relevant in building high quality java web applications. I highly recommend that you get a copy for your collection!

Spring is Born
Shortly after the release of the book, developers Juergen Hoeller and Yann Caroff persuaded Rod Johnson to create an open source project based on the infrastructure code. Rod, Juergen and Yann started collaborating on the project around February 2003. It was Yann who coined the name "spring" for the new framework. According to Rod, spring represented a fresh start after the "winter" of traditional J2EE! Here is an excerpt from Yann Caroff's review of Rod's book in January 2003!,

Rod Johnson's book covers the world of J2EE best practices in an amazingly exhaustive, informative and pragmatic way. From coding standards, idioms, through a fair criticism of entity beans, unit testing, design decisions, persistence, caching, EJBs, model-2 presentation tier, views, validation techniques, to performance, the reader takes a trip to the wonderland of project development reality, constraints, risk and again, best practices. Each chapter of the book brings its share of added value. This is not a book, this is truly a knowledge base.

In June 2003, spring 0.9 was released under Apache 2.0 license. In March 2004, spring 1.0 was released. Interestingly, even before 1.0 release, spring was widely adopted by developers. In August 2004, Rod Johnson, Juergen Hoeller, Keith Donald and Colin Sampaleanu co-founded interface21, a company focused on spring consulting, training and support.

Yann Caroff left the team in the early days. Rod Johnson left spring team in 2012. Juergen Hoeller is still an active member of spring development team.

Rapid Growth of Spring Framework
Spring framework rapidly evolved since the 1.0 release in 2004. Spring 2.0 was released in October 2006 and by that time spring downloads crossed the 1 million mark. Spring 2.0 had features such as extensible XML configuration which was used to simplify XML configuration, support for Java 5, additional IoC container extension points, support for dynamic languages such as groovy, aop enhancements and new bean scopes.

Interface21 company which managing the spring projects under Rod's leadership was renamed to SpringSource in November 2007. At the same time Spring 2.5 was released. Major new features in spring 2.5 included support for Java 6/Java EE 5, support for annotation configuration, component auto-detection in classpath and OSGi compliant bundles.

In 2007, SpringSource secured series A funding ($10 million) from benchmark capital. SpringSource raised additional capital in 2008 through series B funding from accel partners and benchmark. SpringSource acquires a number of companies during this timeframe (Covalent, Hyperic, G2One etc.). In August 2009, SpringSource was acquired by VMWare for $420 million! Within a few weeks SpringSource acquired cloud foundry, a cloud PaaS provider. In 2015, cloud foundry was moved to the not-for-profit cloud foundry foundation.

In December 2009, spring 3.0 was released. Spring 3.0 had a number of major features such as reorganized module system, support for spring expression language, java based bean configuration(JavaConfig), support for embedded databases such as HSQL, H2 and Derby, model validation/REST support and support for Java EE 6.

A number of minor versions of 3.x series was released in 2011 and 2012. In July 2012, Rod Johnson left the spring team. In April 2013, VMware and EMC create a joint venture called Pivotal with GE investment. All the spring application projects were moved to Pivotal.

In December 2013, Pivotal announced the release of spring framework 4.0. Spring 4.0 was major step forward for spring framework and it included features such as full support for Java 8, higher third party library dependencies(groovy 1.8+, ehcache 2.1+, hibernate 3.6+ etc.), Java EE 7 support, groovy DSL for bean definitions, support for websockets and  support for generic types as a qualifier for injecting beans.

A number of spring framework 4.x.x releases came out in the 2014 to 2017 period. The current spring framework version(4.3.7) was released in March 2017. Spring framework 4.3.8 is scheduled for release in April 2017 and it will be the last one in the 4.x series.

The next major version of spring framework is spring 5.0. It is currently scheduled for release in the last quarter of 2017. However this may change as it has a dependency on the JDK 9 release.

History of Spring Boot

In October 2012, Mike Youngstrom‏ created a feature request in spring jira asking for support for containerless web application architectures in spring framework. He talked about configuring web container services within a spring container bootstrapped from the main method! Here is an excerpt from the jira request,

I think that Spring's web application architecture can be significantly simplified if it were to provided tools and a reference architecture that leveraged the Spring component and configuration model from top to bottom. Embedding and unifying the configuration of those common web container services within a Spring Container bootstrapped from a simple main() method.

This request lead to the development of spring boot project starting sometime in early 2013. In April 2014, spring boot 1.0.0 was released. Since then a number of spring boot minor versions came out,

  • Spring boot 1.1 (June 2014) - improved templating support, gemfire support, auto configuration for elasticsearch and apache solr.
  • Spring boot 1.2 (March 2015) - upgrade to servlet 3.1/tomcat 8/jetty 9, spring 4.1 upgrade, support for banner/jms/SpringBootApplication annotation.
  • Spring boot 1.3 (December 2016) - spring 4.2 upgrade, new spring-boot-devtools, auto configuration for caching technologies(ehcache, hazelcast, redis, guava and infinispan) and fully executable jar support.
  • Spring boot 1.4 (January 2017) - spring 4.3 upgrade, couchbase/neo4j support, analysis of startup failures and RestTemplateBuilder.
  • Spring boot 1.5 (February 2017) - support for kafka/ldap, third party library upgrades, deprecation of CRaSH support and actuator loggers endpoint to modify application log levels on the fly.

The simplicity of spring boot lead to quick large scale adoption of the project by java developers. Spring boot is arguably one of the fastest ways to develop REST based microservice web applications in java. It is also very suitable for docker container deployments and quick prototyping.

Spring IO and Spring Boot

In June 2014, spring io 1.0.0 was released. Spring io represents a predefined set of dependencies between application libraries (includes spring projects and third party libraries). This means that if you create a project using a specific spring IO version, you no longer needs to define versions of the libraries you use! Note that this includes spring libraries and most of the popular third party libraries. Even spring boot starter projects are part of this spring io. For example, if you are using spring io 1.0.0, you don't need to specify spring boot version when adding dependencies of starter project. It will automatically assume it to be spring boot 1.1.1.RELEASE.

Conceptually spring io consists of a foundation layer of modules and execution layer domain specific runtimes(DSRs). The foundation layer represents the curated list of core spring modules and third party dependencies. Spring boot is one of the execution layer DSRs provided by spring IO. Hence now there are two main ways to build spring applications,

  • Use spring boot directly with or without using spring io.
  • Use spring io with required spring modules.

Note that usually whenever a new spring framework version is released, it will trigger a new spring boot release. This will in turn trigger a new spring io release.

In November 2015, Spring io 2.0.0 was released. This provided an updated set of dependencies including spring boot 1.3. In July 2016, spring io team decided to use alphabetical versioning scheme. Spring IO uses city names for this. In the alphabetical versioning scheme, a new name indicates minor and major upgrades to the dependency libraries. Hence depending on the individual components used, your application may require modifications. However the service releases under a new name always indicates a maintenance release and hence you could use it without breaking your code.

In September 2016, Athens, the first spring io platform release with alphabetical city naming was released. It contained spring boot 1.4 and other third party library upgrades. Since then a number of service releases for Athens was released (SR1, SR2, SR3 and SR4).

In March 2017, the latest spring io platform (Brussels-SR1) was released. It uses the latest spring boot release(1.5.2.RELEASE). The next spring io platform is Cairo scheduled for release with spring boot 2.0 and spring framework 5.0.

Future of Spring

Spring 5.0 is scheduled for release in last quarter of 2017 with JDK 9 support. Spring 5.0 release is a pre-requisite for spring boot 2.0 release. Spring io cairo requires release of spring boot 2.0. If everything goes well with the JDK 9 release, all the above versions should be available before 2018.

JDK 9 => Spring 5.0 => Spring Boot 2.0 => Spring IO Cairo.

Spring Timeline Infographic

Check out the following infographic for a quick look at the spring history.
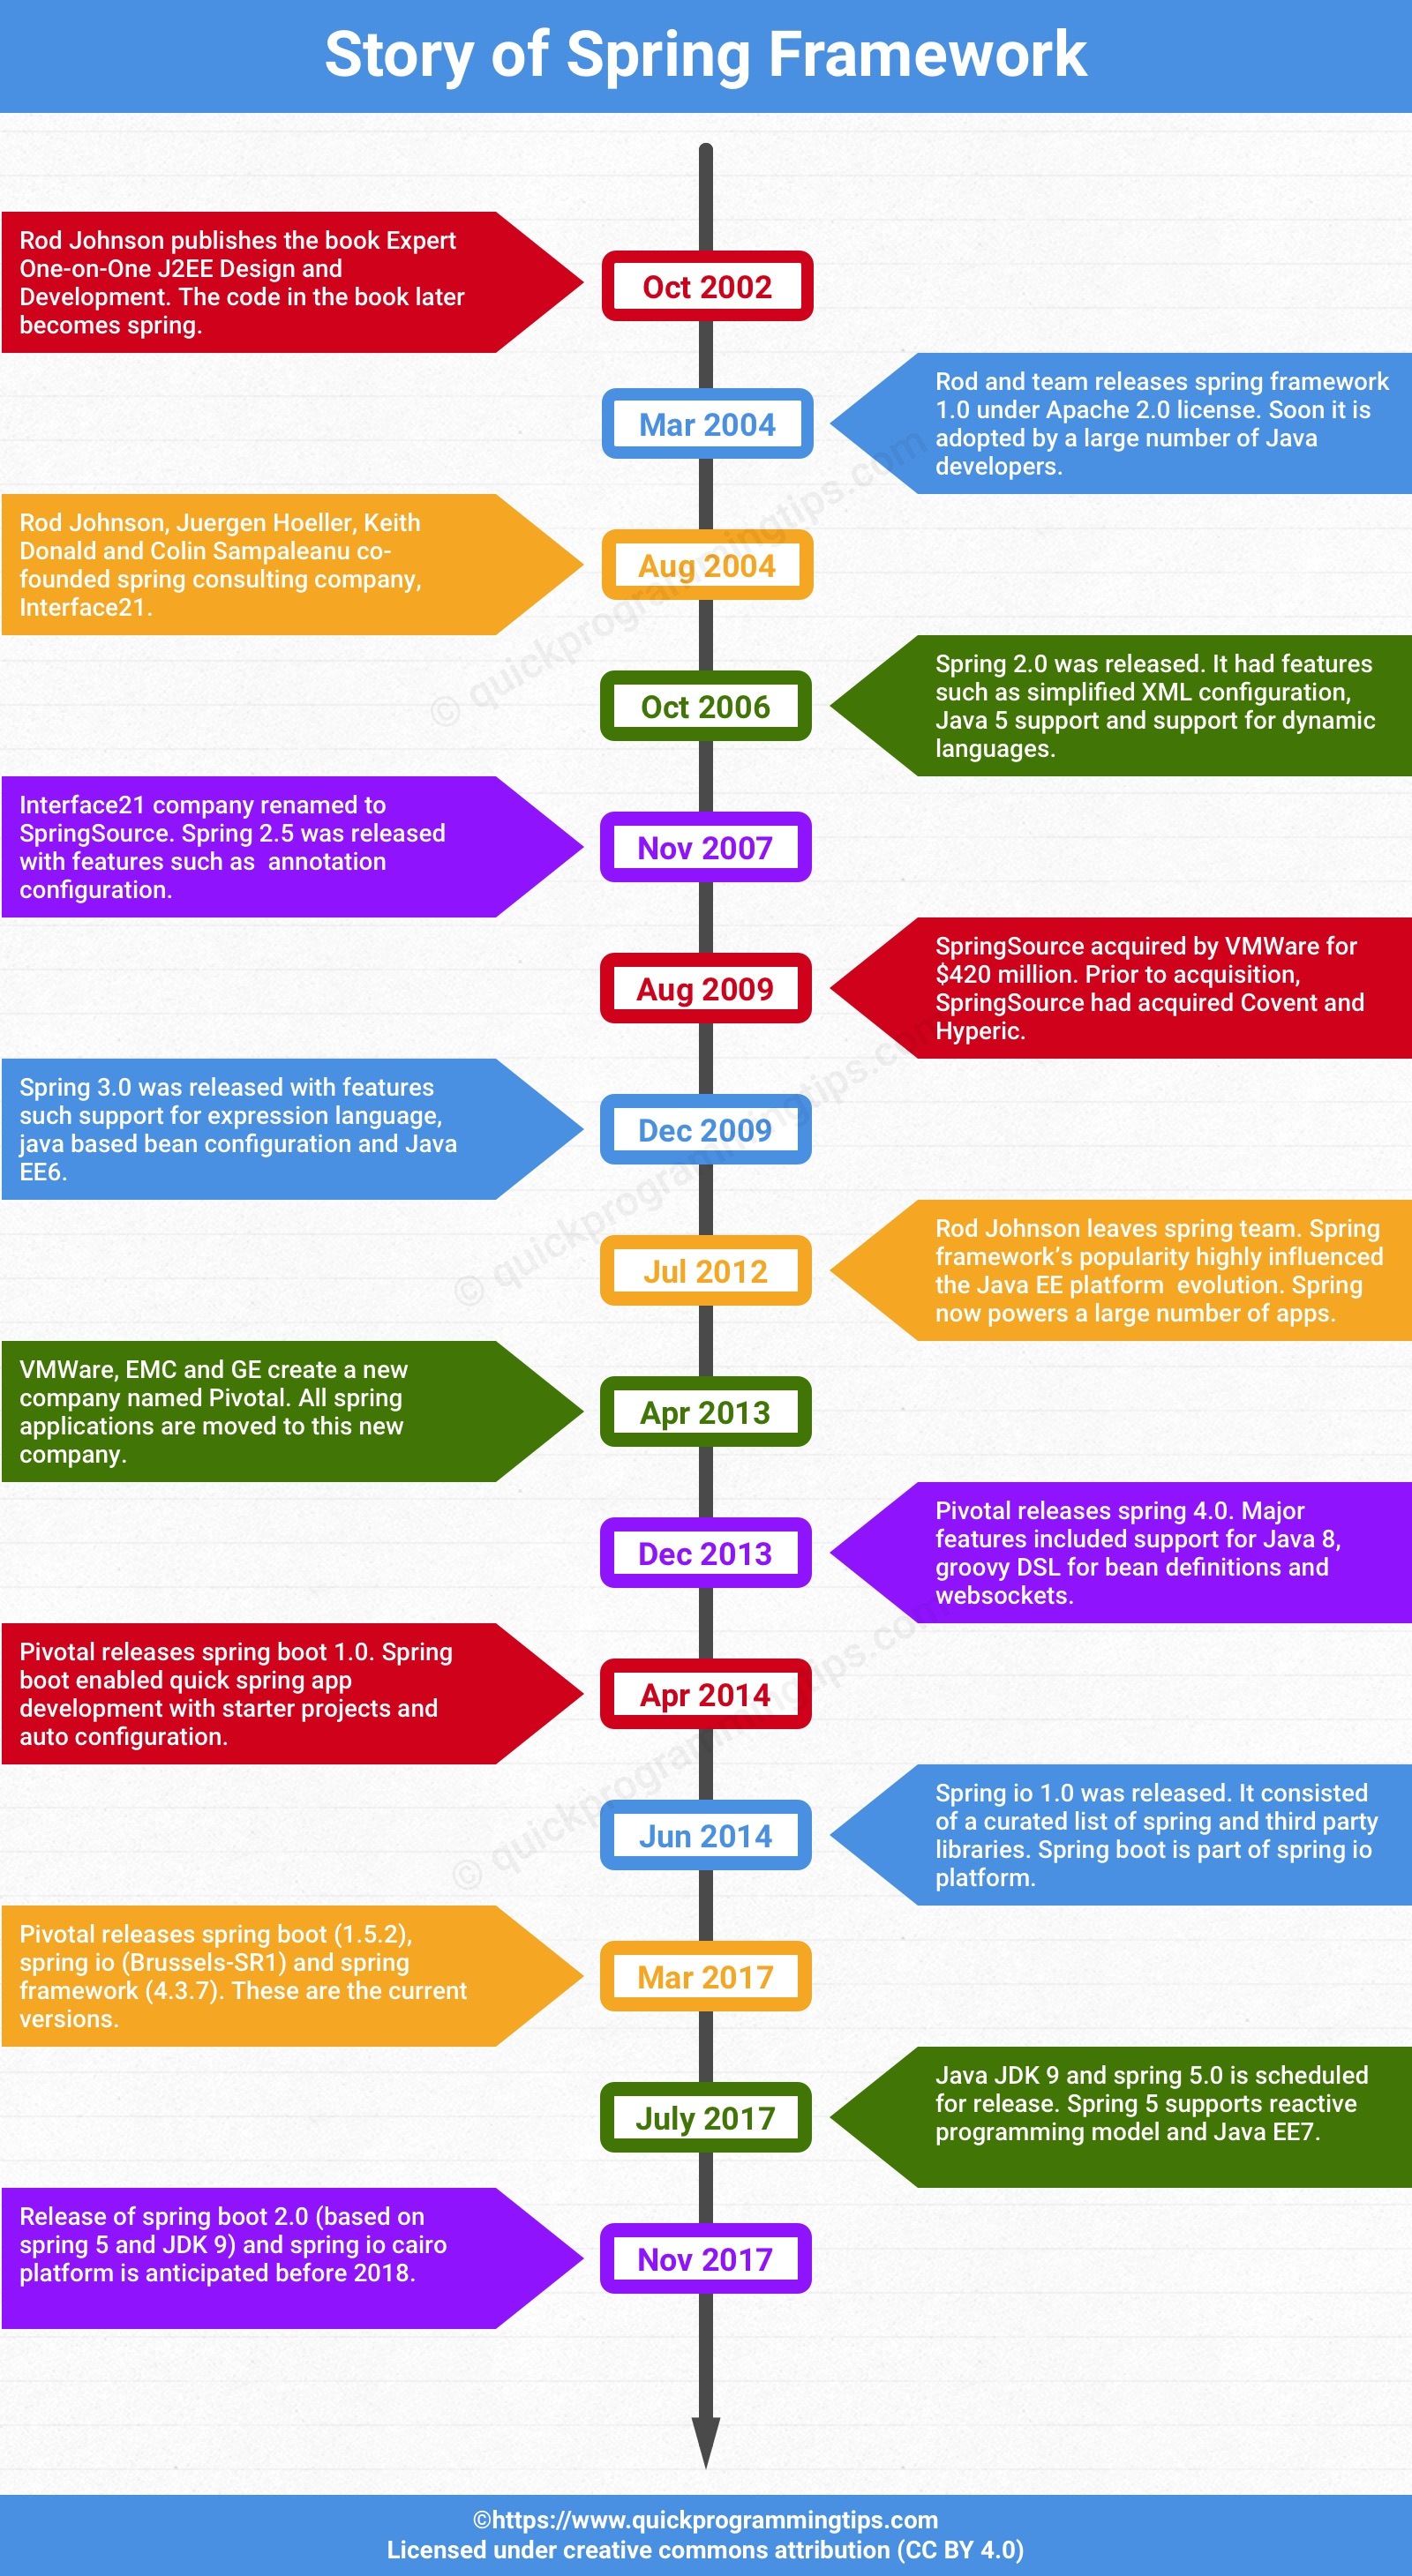
spring-history-infographic


Random Alphanumeric Generator in Java

The following Java example program generates a cryptographically secure random alphanumeric string. If cryptographic security is not a requirement, the SecureRandom class can be replaced with Random class for a much faster implementation.

The following function can be used to generate random strings with a specified length. It is also possible to specify a subset of character set in the random string by modifying the CHARACTER_SET variable.

import java.security.SecureRandom;

// Example - Random alphanumeric generator in Java
public class RandomAlphaNumericGenerator {
    private static SecureRandom random = new SecureRandom();
    private static final String CHARACTER_SET="0123456789abcdefghijklmnopqrstuvwxyz"; 
    
    public static void main(String[] args) {
        System.out.println("Random Alphanumeric String:"+getRandomString(32));
    }

    // Create a random alphanumeric string
    private static String getRandomString(int len) {
        StringBuffer buff = new StringBuffer(len);
        for(int i=0;i<len;i++) {
            int offset = random.nextInt(CHARACTER_SET.length());
            buff.append(CHARACTER_SET.substring(offset,offset+1));
        }
        return buff.toString();
    }
}

How to Pick a Random Character in Java

The following Java program can be used to generate a random character in Java. There are three functions in the program.

  • getRandomCharacter() returns a random character in the ASCII printable character set.
  • getRandomAlphabet() returns a random alphabet in english (a - z).
  • getRandomAlphaNum() returns a random alphanumeric character (0 - 9 & a - z).
import java.util.Random;

// Example - Java class to generate random characters
public class RandomCharDemo {
    
    public static final String ALPHANUMERIC_CHARACTERS = "0123456789abcdefghijklmnopqrstuvwxyz";
    
    public static void main(String[] args) {
        System.out.println("Random character:"+getRandomCharacter());
        System.out.println("Random Alphabet:"+getRandomAlphabet());
        System.out.println("Random Alphanumeric:"+getRandomAlphaNum());
        
    }

    // Create a random alphanumeric character in Java
    // Random alphanumeric generator function in Java
    // Only lowercase letters
    private static String getRandomAlphaNum() {
        Random r = new Random();
        int offset = r.nextInt(ALPHANUMERIC_CHARACTERS.length());
        return ALPHANUMERIC_CHARACTERS.substring(offset, offset+1);
    }

    // Create a random alphabet in Java
    // Only lowercase letters
    private static String getRandomAlphabet() {
        Random r = new Random();
        return String.valueOf((char)(r.nextInt(26)+'a'));
    }

    // Create a random ASCII printable character in Java
    // Returns both lowercase and uppercase letters
    private static String getRandomCharacter() {
        Random r = new Random();
        return String.valueOf((char)(r.nextInt(95)+32));
    }
}

There are number of uses for these functions. These can be used for generating random passwords or for generating random words in a program.

How to Install Hadoop on Mac OS X El Capitan

This tutorial contains step by step instructions for installing hadoop 2.x on Mac OS X El Capitan. These instructions should work on other Mac OS X versions such as Yosemite and Sierra. This tutorial uses pseudo-distributed mode for running hadoop which allows us to use a single machine to run different components of the system in different Java processes. We will also configure YARN as the resource manager for running jobs on hadoop.

Hadoop Component Versions

  • Java 7 or higher. Java 8 is recommended.
  • Hadoop 2.7.3 or higher.

Hadoop Installation on Mac OS X Sierra & El Capitan

Step 1: Install Java

Hadoop 2.7.3 requires Java 7 or higher. Run the following command in a terminal to verify the Java version installed on the system.

java -version
Java version "1.8.0_121"
Java(TM) SE Runtime Environment (build 1.8.0_121-b13)
Java HotSpot(TM) 64-Bit Server VM (build 25.121-b13, mixed mode)

If Java is not installed, you can get it from here.

Step 2: Configure SSH

When hadoop is installed in distributed mode, it uses a password less SSH for master to slave communication. To enable SSH daemon in mac, go to System Preferences => Sharing. Then click on Remote Login to enable SSH. Execute the following commands on the terminal to enable password less login to SSH,

ssh-keygen -t dsa -P '' -f ~/.ssh/id_dsa
cat ~/.ssh/id_dsa.pub >> ~/.ssh/authorized_keys

Step 3 : Install Hadoop

Download hadoop 2.7.3 binary zip file from this link (200MB). Extract the contents of the zip to a folder of your choice.

Step 4: Configure Hadoop

First we need to configure the location of our Java installation in etc/hadoop/hadoop-env.sh. To find the location of Java installation, run the following command on the terminal,

/usr/libexec/java_home
/Library/Java/JavaVirtualMachines/jdk1.8.0_121.jdk/Contents/Home

Copy the output of the command and use it to configure JAVA_HOME variable in etc/hadoop/hadoop-env.sh.

export JAVA_HOME=/Library/Java/JavaVirtualMachines/jdk1.8.0_121.jdk/Contents/Home

Modify various hadoop configuration files to properly setup hadoop and yarn. These files are located in etc/hadoop.

etc/hadoop/core-site.xml

<configuration>
    <property>
        <name>fs.defaultFS</name>
        <value>hdfs://localhost:9000</value>
    </property>
</configuration>

etc/hadoop/hdfs-site.xml

<configuration>
    <property>
        <name>dfs.replication</name>
        <value>1</value>
    </property>
</configuration>

etc/hadoop/mapred-site.xml

<configuration>
    <property>
        <name>mapreduce.framework.name</name>
        <value>yarn</value>
    </property>
</configuration>

etc/hadoop/yarn-site.xml

<configuration>
    <property>
        <name>yarn.nodemanager.aux-services</name>
        <value>mapreduce_shuffle</value>
    </property>
    <property>
        <name>yarn.nodemanager.env-whitelist</name>
        <value>JAVA_HOME, HADOOP_COMMON_HOME, HADOOP_HDFS_HOME, HADOOP_CONF_DIR, CLASSPATH_PREPEND_DISTCACHE, HADOOP_YARN_HOME, HADOOP_MAPRED_HOME
        </value>
    </property>
    <property>
        <name>yarn.nodemanager.disk-health-checker.max-disk-utilization-per-disk-percentage
        </name>
        <value>98.5</value>
    </property>
</configuration>

Note the use of disk utilization threshold above. This tells yarn to continue operations when disk utilization is below 98.5. This was required in my system since my disk utilization was 95% and the default value for this is 90%. If disk utilization goes above the configured threshold, yarn will report the node instance as unhealthy nodes with error "local-dirs are bad".

Step 5: Initialize Hadoop Cluster

From a terminal window switch to the hadoop home folder (the folder which contains various sub folders such as bin and etc). Run the following command to initialize the metadata for the hadoop cluster. This formats the hdfs file system and configures it on the local system. By default, files are created in /tmp/hadoop-<username> folder.

bin/hdfs namenode -format

It is possible to modify the default location of name node configuration by adding the following property in the hdfs-site.xml file. Similarly the hdfs data block storage location can be changed using dfs.data.dir property.

<property>
    <name>dfs.name.dir</name>
    <value>/usr/local/hadoop/dfs/name</value>
    <final>true</final>
</property>

The following commands should be executed from the hadoop home folder.

Step 6: Start Hadoop Cluster

Run the following command from terminal (after switching to hadoop home folder) to start the hadoop cluster.  This starts name node and data node on the local system.

sbin/start-dfs.sh

To verify that the namenode and datanode daemons are running, execute the following command on the terminal. This displays running Java processes on the system.

jps
19203 DataNode
29219 Jps
19126 NameNode
19303 SecondaryNameNode

Step 7: Configure HDFS Home Directories

We will now configure the hdfs home directories. The home directory is of the form - /user/<username>.  My user id on the mac system is jj. Replace it with your user name. Run the following commands on the terminal,

bin/hdfs dfs -mkdir /user
bin/hdfs dfs -mkdir /user/jj

Step 8: Run YARN Manager

Start YARN resource manager and node manager instances by running the following command on the terminal,

sbin/start-yarn.sh

Run jps command again to verify all the running processes,

jps
19203 DataNode
29283 Jps
19413 ResourceManager
19126 NameNode
19303 SecondaryNameNode
19497 NodeManager

Step 9: Verify Hadoop Installation

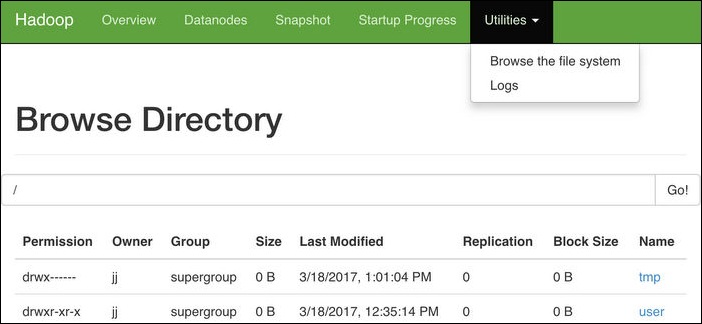
Access the URL http://localhost:50070/dfshealth.html to view hadoop name node configuration. You can also navigate the hdfs file system using the menu Utilities => Browse the file system.

hadoop-name-node-browser-console

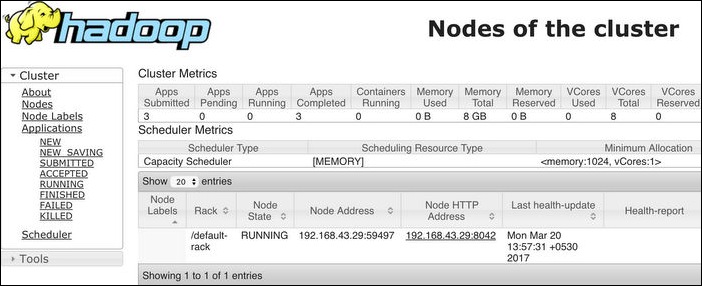
Access the URL http://localhost:8088/cluster to view the hadoop cluster details through YARN resource manager.

hadoop-yarn-browser-console

Step 10: Run Sample MapReduce Job

Hadoop installation contains a number of sample mapreduce jobs. We will run one of them to verify that our hadoop installation is working fine.

We will first copy a file from local system to the hdfs home folder. We will use core-site.xml in etc/hadoop as our input,

bin/hdfs dfs -copyFromLocal etc/hadoop/core-site.xml .

Verify that the file is in HDFS folder by navigating to the folder from the name node browser console.

Let us run a mapreduce program on this hdfs file to find the number of occurrences of the word "configuration" in the file. A mapreduce program for word count is available in the hadoop samples.

bin/hadoop jar share/hadoop/mapreduce/hadoop-mapreduce-examples-2.7.3.jar grep ./core-site.xml output 'configuration'

This runs the mapreduce on the hdfs file uploaded earlier and then outputs the results to the output folder inside the hdfs home folder. The file will be named as part-r-00000. This can be downloaded from the name node browser console or run the following command to copy it to the local folder.

bin/hdfs dfs -get output/* .

Print the contents of the file. This contains the number of occurrences of the word "configuration" in core-site.xml.

cat part*
3    configuration

Finally delete the uploaded file and the output folder from hdfs system,

bin/hdfs dfs -rmr output
bin/hdfs dfs -rm core-site.xml

Step 11: Stop Hadoop/YARN Cluster

Run the following commands to stop hadoop/YARN daemons. This stops name node, data node, node manager and resource manager.

sbin/stop-yarn.sh
sbin/stop-dfs.sh

How to Read HDFS File in Java

Hadoop distributed file system (HDFS) can be accessed using native Java API provided by hadoop Java library. The following example uses FileSystem API to read an existing file in an hdfs folder. Before running the following Java program, ensure that the following values are changed as per your hadoop installation.

  • Modify the HDFS_ROOT_URL to point to the hadoop IPC endpoint. This can be copied from the etc/hadoop/core-site.xml file.
  • Modify the hdfs file path used in the program. The following program prints the file input.txt located in /user/jj hdfs folder. The default hdfs home folder is named as /user/<username>. Ensure that a file is already uploaded to the hdfs folder. To copy input.txt from your hadoop folder to the dfs You can use the command "bin/hadoop dfs -copyFromLocal input.txt .".

Prerequisites

  • Java 1.8+
  • Gradle 3.x+
  • Hadoop 2.x

How to Read an HDFS File Using Gradle Java Project

Step 1: Create a simple gradle java project using the following command. This assumes that gradle is already installed on your system.

gradle init --type java-application

Step 2: Replace the file build.gradle with the following,

apply plugin: 'java-library'
apply plugin: 'application'

mainClassName = "HDFSDemo"

jar {
	manifest {
		attributes 'Main-Class': "$mainClassName"
	}
}
repositories {
    jcenter()
}

dependencies {
	compile 'org.apache.hadoop:hadoop-client:2.7.3'
}

Note the dependency on hadoop 2.7.3. Update this value if you are working with a different hadoop server version.

Step 3: Add the Java class HDFSDemo.java to the src/main/java folder. Delete App.java and AppTest.java from the project folder.

import java.io.InputStream;
import java.net.URI;

import org.apache.hadoop.conf.Configuration;
import org.apache.hadoop.fs.FileSystem;
import org.apache.hadoop.fs.Path;
import org.apache.hadoop.io.IOUtils;

// Sample Java program to read files from hadoop hdfs filesystem
public class HDFSDemo {

	// This is copied from the entry in core-site.xml for the property fs.defaultFS. 
	// Replace with your Hadoop deployment details.
	public static final String HDFS_ROOT_URL="hdfs://localhost:9000";
	private Configuration conf;

	public static void main(String[] args) throws Exception {
		HDFSDemo demo = new HDFSDemo();
		
		// Reads a file from the user's home directory.
		// Replace jj with the name of your folder
		// Assumes that input.txt is already in HDFS folder
		String uri = HDFS_ROOT_URL+"/user/jj/input.txt";
		demo.printHDFSFileContents(uri);
	}
	
	public HDFSDemo() {
		conf = new Configuration();
	}
	
	// Example - Print hdfs file contents to console using Java
	public void printHDFSFileContents(String uri) throws Exception {
		FileSystem fs = FileSystem.get(URI.create(uri), conf);
		InputStream in = null;
		try {
			in = fs.open(new Path(uri));
			IOUtils.copyBytes(in, System.out, 4096, false);
		} finally {
			IOUtils.closeStream(in);
		}
	}

}

Step 4: Build and run the application using the gradle wrapper command below. The contents of the hadoop hdfs file will be printed on the console.

./gradlew run