How to Install Hadoop on Mac OS X El Capitan
This tutorial contains step by step instructions for installing hadoop 2.x on Mac OS X El Capitan. These instructions should work on other Mac OS X versions such as Yosemite and Sierra. This tutorial uses pseudo-distributed mode for running hadoop which allows us to use a single machine to run different components of the system in different Java processes. We will also configure YARN as the resource manager for running jobs on hadoop.
Hadoop Component Versions
- Java 7 or higher. Java 8 is recommended.
- Hadoop 2.7.3 or higher.
Hadoop Installation on Mac OS X Sierra & El Capitan
Step 1: Install Java
Hadoop 2.7.3 requires Java 7 or higher. Run the following command in a terminal to verify the Java version installed on the system.
Java(TM) SE Runtime Environment (build 1.8.0_121-b13)
Java HotSpot(TM) 64-Bit Server VM (build 25.121-b13, mixed mode)
If Java is not installed, you can get it from here.
Step 2: Configure SSH
When hadoop is installed in distributed mode, it uses a password less SSH for master to slave communication. To enable SSH daemon in mac, go to System Preferences => Sharing. Then click on Remote Login to enable SSH. Execute the following commands on the terminal to enable password less login to SSH,
ssh-keygen -t dsa -P '' -f ~/.ssh/id_dsa
cat ~/.ssh/id_dsa.pub >> ~/.ssh/authorized_keys
Step 3 : Install Hadoop
Download hadoop 2.7.3 binary zip file from this link (200MB). Extract the contents of the zip to a folder of your choice.
Step 4: Configure Hadoop
First we need to configure the location of our Java installation in etc/hadoop/hadoop-env.sh. To find the location of Java installation, run the following command on the terminal,
/Library/Java/JavaVirtualMachines/jdk1.8.0_121.jdk/Contents/Home
Copy the output of the command and use it to configure JAVA_HOME variable in etc/hadoop/hadoop-env.sh.
export JAVA_HOME=/Library/Java/JavaVirtualMachines/jdk1.8.0_121.jdk/Contents/Home
Modify various hadoop configuration files to properly setup hadoop and yarn. These files are located in etc/hadoop.
etc/hadoop/core-site.xml
<configuration>
    <property>
        <name>fs.defaultFS</name>
        <value>hdfs://localhost:9000</value>
    </property>
</configuration>
etc/hadoop/hdfs-site.xml
<configuration>
    <property>
        <name>dfs.replication</name>
        <value>1</value>
    </property>
</configuration>
etc/hadoop/mapred-site.xml
<configuration>
    <property>
        <name>mapreduce.framework.name</name>
        <value>yarn</value>
    </property>
</configuration>
etc/hadoop/yarn-site.xml
<configuration>
    <property>
        <name>yarn.nodemanager.aux-services</name>
        <value>mapreduce_shuffle</value>
    </property>
    <property>
        <name>yarn.nodemanager.env-whitelist</name>
        <value>JAVA_HOME, HADOOP_COMMON_HOME, HADOOP_HDFS_HOME, HADOOP_CONF_DIR, CLASSPATH_PREPEND_DISTCACHE, HADOOP_YARN_HOME, HADOOP_MAPRED_HOME
        </value>
    </property>
    <property>
        <name>yarn.nodemanager.disk-health-checker.max-disk-utilization-per-disk-percentage
        </name>
        <value>98.5</value>
    </property>
</configuration>
Note the use of disk utilization threshold above. This tells yarn to continue operations when disk utilization is below 98.5. This was required in my system since my disk utilization was 95% and the default value for this is 90%. If disk utilization goes above the configured threshold, yarn will report the node instance as unhealthy nodes with error "local-dirs are bad".
Step 5: Initialize Hadoop Cluster
From a terminal window switch to the hadoop home folder (the folder which contains various sub folders such as bin and etc). Run the following command to initialize the metadata for the hadoop cluster. This formats the hdfs file system and configures it on the local system. By default, files are created in /tmp/hadoop-<username> folder.
It is possible to modify the default location of name node configuration by adding the following property in the hdfs-site.xml file. Similarly the hdfs data block storage location can be changed using dfs.data.dir property.
<property>
    <name>dfs.name.dir</name>
    <value>/usr/local/hadoop/dfs/name</value>
    <final>true</final>
</property>
The following commands should be executed from the hadoop home folder.
Step 6: Start Hadoop Cluster
Run the following command from terminal (after switching to hadoop home folder) to start the hadoop cluster. This starts name node and data node on the local system.
To verify that the namenode and datanode daemons are running, execute the following command on the terminal. This displays running Java processes on the system.
29219 Jps
19126 NameNode
19303 SecondaryNameNode
Step 7: Configure HDFS Home Directories
We will now configure the hdfs home directories. The home directory is of the form - /user/<username>. My user id on the mac system is jj. Replace it with your user name. Run the following commands on the terminal,
Step 8: Run YARN Manager
Start YARN resource manager and node manager instances by running the following command on the terminal,
Run jps command again to verify all the running processes,
29283 Jps
19413 ResourceManager
19126 NameNode
19303 SecondaryNameNode
19497 NodeManager
Step 9: Verify Hadoop Installation
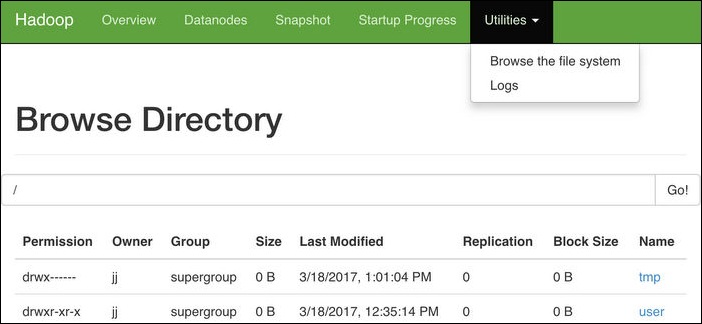
Access the URL http://localhost:50070/dfshealth.html to view hadoop name node configuration. You can also navigate the hdfs file system using the menu Utilities => Browse the file system.

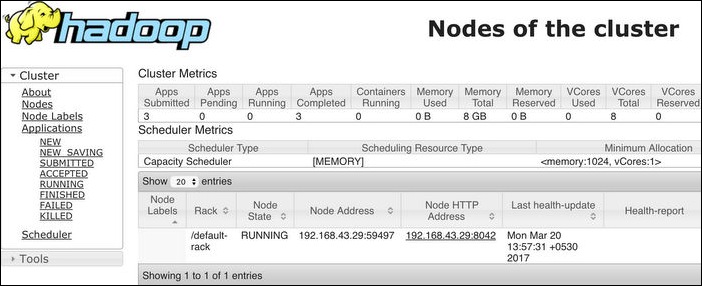
Access the URL http://localhost:8088/cluster to view the hadoop cluster details through YARN resource manager.

Step 10: Run Sample MapReduce Job
Hadoop installation contains a number of sample mapreduce jobs. We will run one of them to verify that our hadoop installation is working fine.
We will first copy a file from local system to the hdfs home folder. We will use core-site.xml in etc/hadoop as our input,
bin/hdfs dfs -copyFromLocal etc/hadoop/core-site.xml .
Verify that the file is in HDFS folder by navigating to the folder from the name node browser console.
Let us run a mapreduce program on this hdfs file to find the number of occurrences of the word "configuration" in the file. A mapreduce program for word count is available in the hadoop samples.
This runs the mapreduce on the hdfs file uploaded earlier and then outputs the results to the output folder inside the hdfs home folder. The file will be named as part-r-00000. This can be downloaded from the name node browser console or run the following command to copy it to the local folder.
Print the contents of the file. This contains the number of occurrences of the word "configuration" in core-site.xml.
Finally delete the uploaded file and the output folder from hdfs system,
Step 11: Stop Hadoop/YARN Cluster
Run the following commands to stop hadoop/YARN daemons. This stops name node, data node, node manager and resource manager.
I ended up reinstalling using homebrew and modifying only etc/hadoop/core-site.xml as above, leaving the other configuration files alone (i.e., with empty configuration).
Thanks again!