Java Asymmetric Encryption Decryption Example with RSA

Asymmetric encryption is a strong encryption technique which uses a key pair. The key pair consists  of a public key and a private key. Data or message encrypted using the private key can only be decrypted using the public key and vice versa. Many internet protocols and secure processes use asymmetric key encryption. For example SSH, SSL and digital signatures use asymmetric key encryption.  Asymmetric key encryption assures confidentiality, integrity, authenticity and non-repudiability of the data being transferred from one system to another.

Asymmetric key encryption can be implemented in a number of algorithms. Some of the common algorithms are RSA, DSA and Elliptic Curve. The most commonly used asymmetric key algorithm is RSA. Java has good support for RSA algorithm. The following code example for RSA encryption is written in Java 8 (uses the new Base64 class).

import java.security.KeyPair;
import java.security.KeyPairGenerator;
import java.security.PrivateKey;
import java.security.PublicKey;
import java.util.Base64;
import java.util.HashMap;
import java.util.Map;

import javax.crypto.Cipher;

// Java 8 example for RSA encryption/decryption.
// Uses strong encryption with 2048 key size.
public class RSAEncryptionJava8 {

    public static void main(String[] args) throws Exception {
        String plainText = "Hello World!";

        // Generate public and private keys using RSA
        Map<String, Object> keys = getRSAKeys();

        PrivateKey privateKey = (PrivateKey) keys.get("private");
        PublicKey publicKey = (PublicKey) keys.get("public");

        String encryptedText = encryptMessage(plainText, privateKey);
        String descryptedText = decryptMessage(encryptedText, publicKey);

        System.out.println("input:" + plainText);
        System.out.println("encrypted:" + encryptedText);
        System.out.println("decrypted:" + descryptedText);

    }

    // Get RSA keys. Uses key size of 2048.
    private static Map<String,Object> getRSAKeys() throws Exception {
        KeyPairGenerator keyPairGenerator = KeyPairGenerator.getInstance("RSA");
        keyPairGenerator.initialize(2048);
        KeyPair keyPair = keyPairGenerator.generateKeyPair();
        PrivateKey privateKey = keyPair.getPrivate();
        PublicKey publicKey = keyPair.getPublic();

        Map<String, Object> keys = new HashMap<String,Object>();
        keys.put("private", privateKey);
        keys.put("public", publicKey);
        return keys;
    }

    // Decrypt using RSA public key
    private static String decryptMessage(String encryptedText, PublicKey publicKey) throws Exception {
        Cipher cipher = Cipher.getInstance("RSA");
        cipher.init(Cipher.DECRYPT_MODE, publicKey);
        return new String(cipher.doFinal(Base64.getDecoder().decode(encryptedText)));
    }

    // Encrypt using RSA private key
    private static String encryptMessage(String plainText, PrivateKey privateKey) throws Exception {
        Cipher cipher = Cipher.getInstance("RSA");
        cipher.init(Cipher.ENCRYPT_MODE, privateKey);
        return Base64.getEncoder().encodeToString(cipher.doFinal(plainText.getBytes()));
    }

}

The following code example for RSA encryption is written for Java 7. This uses the Apache commons library for base64 encoding. Ensure the Apache commons codec library jar is in the classpath,

import java.security.KeyPair;
import java.security.KeyPairGenerator;
import java.security.PrivateKey;
import java.security.PublicKey;
import java.util.HashMap;
import java.util.Map;

import javax.crypto.Cipher;

import org.apache.commons.codec.binary.Base64;

// Java example for RSA encryption/decryption.
// Uses Apache commons codec library
// Uses strong encryption with 2048 key size.
public class RSAEncryptionJava {

    public static void main(String[] args) throws Exception {
        String plainText = "Hello World!";

        // Generate public and private keys using RSA
        Map<String, Object> keys = getRSAKeys();

        PrivateKey privateKey = (PrivateKey) keys.get("private");
        PublicKey publicKey = (PublicKey) keys.get("public");

        String encryptedText = encryptMessage(plainText, privateKey);
        String descryptedText = decryptMessage(encryptedText, publicKey);

        System.out.println("input:" + plainText);
        System.out.println("encrypted:" + encryptedText);
        System.out.println("decrypted:" + descryptedText);

    }

    // Get RSA keys. Uses key size of 2048.
    private static Map<String, Object> getRSAKeys() throws Exception {
        KeyPairGenerator keyPairGenerator = KeyPairGenerator.getInstance("RSA");
        keyPairGenerator.initialize(2048);
        KeyPair keyPair = keyPairGenerator.generateKeyPair();
        PrivateKey privateKey = keyPair.getPrivate();
        PublicKey publicKey = keyPair.getPublic();

        Map<String, Object> keys = new HashMap<String, Object>();
        keys.put("private", privateKey);
        keys.put("public", publicKey);
        return keys;
    }

    // Decrypt using RSA public key
    private static String decryptMessage(String encryptedText, PublicKey publicKey) throws Exception {
        Cipher cipher = Cipher.getInstance("RSA");
        cipher.init(Cipher.DECRYPT_MODE, publicKey);
        return new String(cipher.doFinal(Base64.decodeBase64(encryptedText)));
    }

    // Encrypt using RSA private key
    private static String encryptMessage(String plainText, PrivateKey privateKey) throws Exception {
        Cipher cipher = Cipher.getInstance("RSA");
        cipher.init(Cipher.ENCRYPT_MODE, privateKey);
        return Base64.encodeBase64String(cipher.doFinal(plainText.getBytes()));
    }
}

Here is the gradle build file for the above example.

apply plugin: 'java'
apply plugin: 'application'

repositories {
    jcenter()
}

dependencies {
    compile 'commons-codec:commons-codec:1.10'

}

When large messages are involved, RSA encryption and decryption can be slow. In such scenarios, a hybrid encryption approach is used. In this method, the large message is encrypted using AES algorithm and then the AES key is encrypted using the RSA algorithm. The AES encrypted message and RSA encrypted AES key is sent across. When the message is received, the AES key is first decrypted using RSA public key and then the message is decrypted using the AES key. The following example in Java 8 demonstrates this hybrid encryption approach.

import java.security.KeyPair;
import java.security.KeyPairGenerator;
import java.security.PrivateKey;
import java.security.PublicKey;
import java.util.Base64;
import java.util.HashMap;
import java.util.Map;

import javax.crypto.Cipher;
import javax.crypto.KeyGenerator;
import javax.crypto.SecretKey;
import javax.crypto.spec.SecretKeySpec;

// Java 8 example for RSA-AES encryption/decryption.
// Uses strong encryption with 2048 key size.
public class RSAEncryptionWithAES {

    public static void main(String[] args) throws Exception {
        String plainText = "Hello World!";

        // Generate public and private keys using RSA
        Map<String, Object> keys = getRSAKeys();
        PrivateKey privateKey = (PrivateKey) keys.get("private");
        PublicKey publicKey = (PublicKey) keys.get("public");

        // First create an AES Key
        String secretAESKeyString = getSecretAESKeyAsString();

        // Encrypt our data with AES key
        String encryptedText = encryptTextUsingAES(plainText, secretAESKeyString);

        // Encrypt AES Key with RSA Private Key
        String encryptedAESKeyString = encryptAESKey(secretAESKeyString, privateKey);

        // The following logic is on the other side.

        // First decrypt the AES Key with RSA Public key
        String decryptedAESKeyString = decryptAESKey(encryptedAESKeyString, publicKey);

        // Now decrypt data using the decrypted AES key!
        String decryptedText = decryptTextUsingAES(encryptedText, decryptedAESKeyString);

        System.out.println("input:" + plainText);
        System.out.println("AES Key:" + secretAESKeyString);
        System.out.println("decrypted:" + decryptedText);

    }

    // Create a new AES key. Uses 128 bit (weak)
    public static String getSecretAESKeyAsString() throws Exception {
        KeyGenerator generator = KeyGenerator.getInstance("AES");
        generator.init(128); // The AES key size in number of bits
        SecretKey secKey = generator.generateKey();
        String encodedKey = Base64.getEncoder().encodeToString(secKey.getEncoded());
        return encodedKey;
    }

    // Encrypt text using AES key
    public static String encryptTextUsingAES(String plainText, String aesKeyString) throws Exception {
        byte[] decodedKey = Base64.getDecoder().decode(aesKeyString);
        SecretKey originalKey = new SecretKeySpec(decodedKey, 0, decodedKey.length, "AES");

        // AES defaults to AES/ECB/PKCS5Padding in Java 7
        Cipher aesCipher = Cipher.getInstance("AES");
        aesCipher.init(Cipher.ENCRYPT_MODE, originalKey);
        byte[] byteCipherText = aesCipher.doFinal(plainText.getBytes());
        return Base64.getEncoder().encodeToString(byteCipherText);
    }

    // Decrypt text using AES key
    public static String decryptTextUsingAES(String encryptedText, String aesKeyString) throws Exception {

        byte[] decodedKey = Base64.getDecoder().decode(aesKeyString);
        SecretKey originalKey = new SecretKeySpec(decodedKey, 0, decodedKey.length, "AES");

        // AES defaults to AES/ECB/PKCS5Padding in Java 7
        Cipher aesCipher = Cipher.getInstance("AES");
        aesCipher.init(Cipher.DECRYPT_MODE, originalKey);
        byte[] bytePlainText = aesCipher.doFinal(Base64.getDecoder().decode(encryptedText));
        return new String(bytePlainText);
    }

    // Get RSA keys. Uses key size of 2048.
    private static Map<String, Object> getRSAKeys() throws Exception {
        KeyPairGenerator keyPairGenerator = KeyPairGenerator.getInstance("RSA");
        keyPairGenerator.initialize(2048);
        KeyPair keyPair = keyPairGenerator.generateKeyPair();
        PrivateKey privateKey = keyPair.getPrivate();
        PublicKey publicKey = keyPair.getPublic();

        Map<String, Object> keys = new HashMap<String, Object>();
        keys.put("private", privateKey);
        keys.put("public", publicKey);
        return keys;
    }

    // Decrypt AES Key using RSA public key
    private static String decryptAESKey(String encryptedAESKey, PublicKey publicKey) throws Exception {
        Cipher cipher = Cipher.getInstance("RSA");
        cipher.init(Cipher.DECRYPT_MODE, publicKey);
        return new String(cipher.doFinal(Base64.getDecoder().decode(encryptedAESKey)));
    }

    // Encrypt AES Key using RSA private key
    private static String encryptAESKey(String plainAESKey, PrivateKey privateKey) throws Exception {
        Cipher cipher = Cipher.getInstance("RSA");
        cipher.init(Cipher.ENCRYPT_MODE, privateKey);
        return Base64.getEncoder().encodeToString(cipher.doFinal(plainAESKey.getBytes()));
    }

}
Display Google Analytics Real time Users in Console Using Java

This is a step by step tutorial on accessing Google Analytics Real time API from Java. The sample code below prints the real time users on a Website using Google analytics real time API. This display is updated every minute on the console. This code is useful if you are building any kind of real time dashboard for analytics data.

Before our application can access Google API, we also need to define a corresponding application on the Google developer console. These are linked using a client id and client secret. In addition, programmatic access to any Google API with user data requires oAuth2 authentication. This requires a user to login to his Google account from the browser  and then give consent to the API client application requesting access to his data. Follow the detailed instructions below to configure access to Google analytics real time API. Note that these steps are similar for any Google API which requires access to user data.

Step 1: Create a New Google Cloud Project and Enable Google Analytics Real time API

Before we can access any Google API programmatically, we need to create a cloud project. We need the cloud project and its credentials before we can even access the oAuth2 APIs.

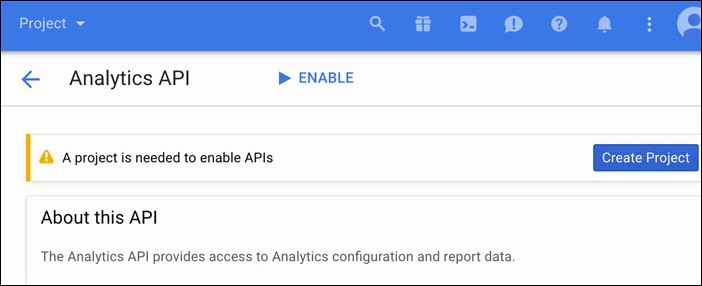
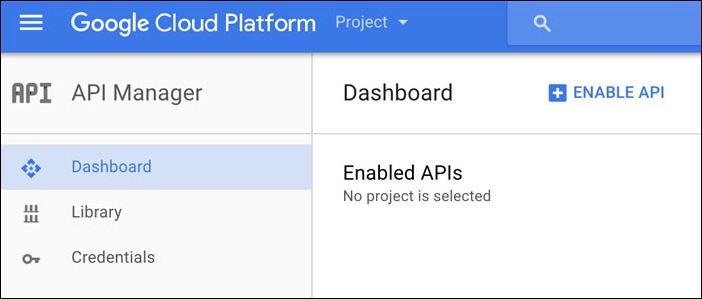
Login to your Google account. This needs to be same account from which we are going to access the Google analytics real time data. After login, click on this link to Google API dashboard. From dashboard click on Enable API and then select Analytics API.

google-enable-api 

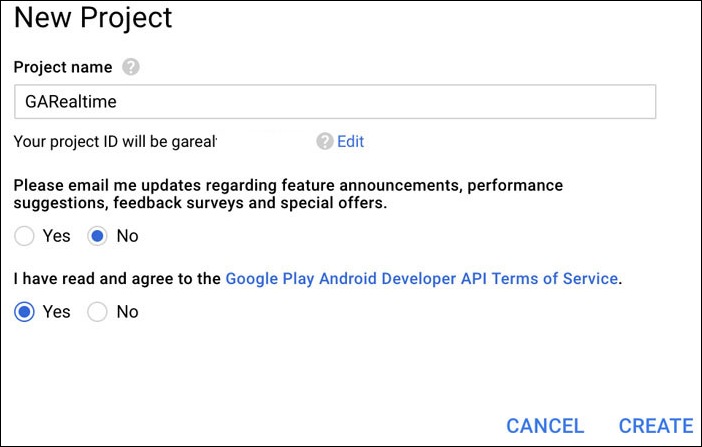
You will be asked to create a new project (if your account already has a project you need to do this manually from the top project menu). Enter the name of the project as GARealtime.

create-google-cloud-project

 new-google-cloud-project-2

New project creation may take a while to complete. Then click Enable button on the top to enable Analytics API for this project. Go back to the dashboard to verify that the selected project (GARealtime) has access to Google analytics API.

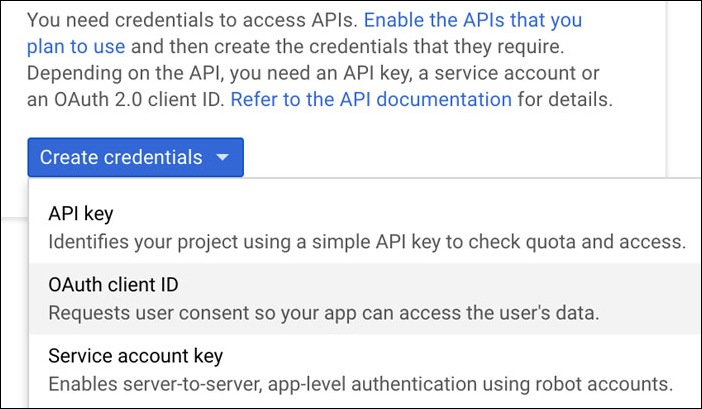
From the API Manager on the left, click on credentials. On the right side click on create credentials and select oAuth Client ID.

create-credentials-google-cloud-project

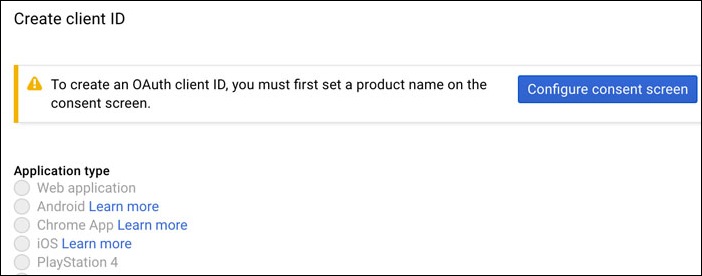
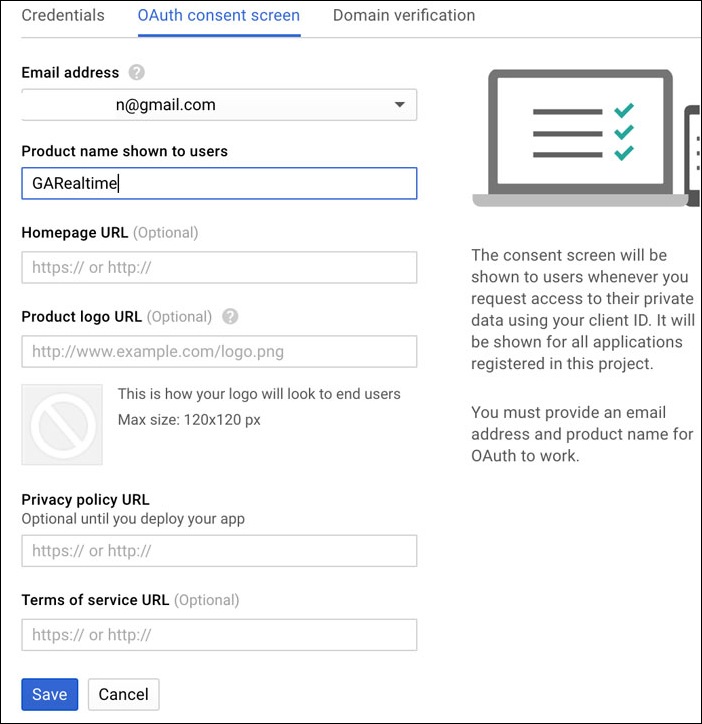
If this is your first project, you need to setup a consent screen. This screen is displayed to the user when an application tries to authenticate a Google user.

create-user-consent-screen

Click on configure consent screen. In the next screen enter the product name as GARealtime and click on Save.

google-oauth2-save-consent-screen

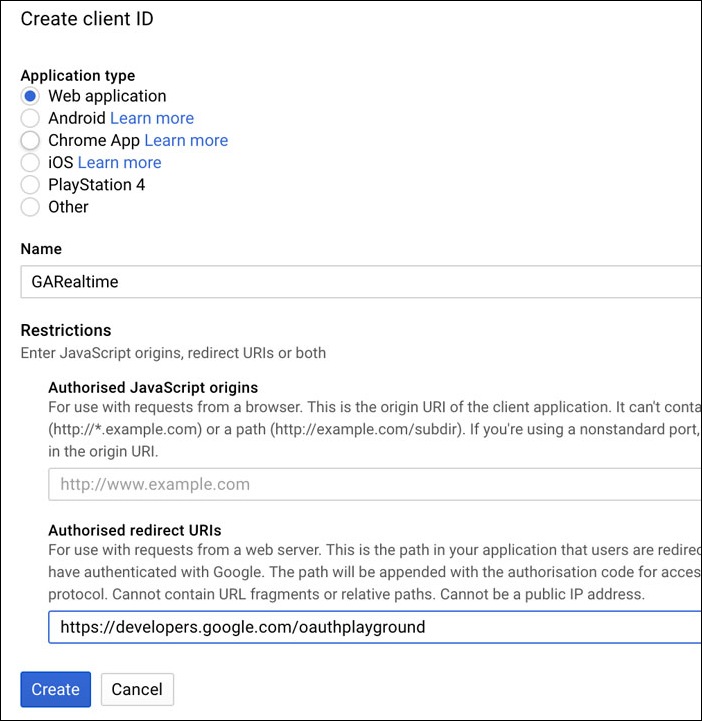
In the next screen, enter the following to create client id and secret,

 google-create-client-id

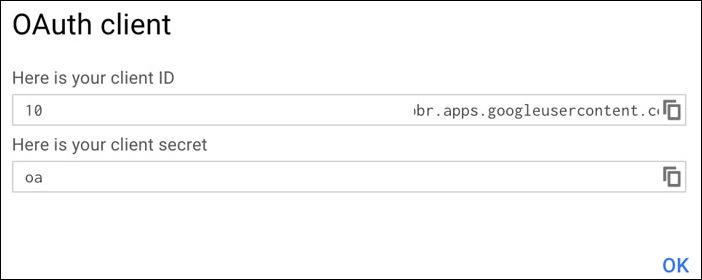
The authorized redirect URI is important since we will be using Google oAuth2 playground for creating refresh token. Click on create to get client id and client secret. Save this somewhere safe. This will be used by our code to authenticate as GARealtime project. We will also use the same to get the refresh token from Google oAuth2 playground.

google-oauth2-client-id

Step 2: Activate Google Analytics Real time API

Google analytics real time API is still in beta. To enable real time API access to your Google cloud project, you need to first find the project number. To find project number, click on this link. Select GARealtime project from the list. You will find the project number as the last option. Copy this number.

Now fill this form with project number copied above to request for access to Analytics Real time API. It may take up to 24 hours for approval.

Step 3: Get Refresh Token from Google oAuth2 Playground

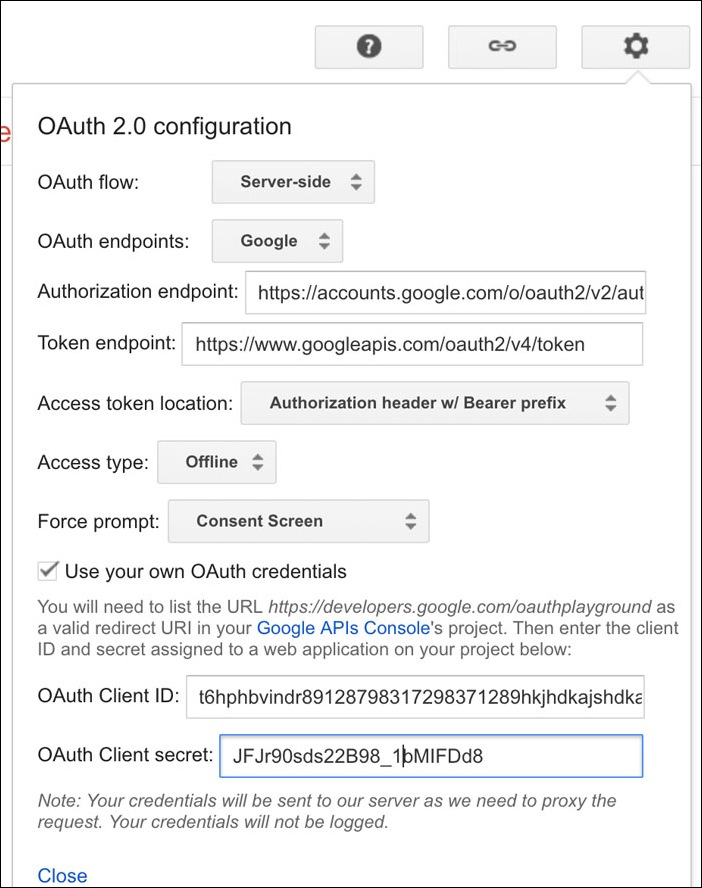
We will now use the client id and client secret to generate a refresh token from Google oAuth2 playground. Our application will use the refresh token along with client id and client secret to generate access token. This refresh token has long term validity and hence you should keep this safe.

Click here to access Google oAuth2 playground. Click on settings icon and then check use your own oAuth credentials option. Enter the client id and client secret as shown below and then click close.

google-oauth2-playground-configure-client-id

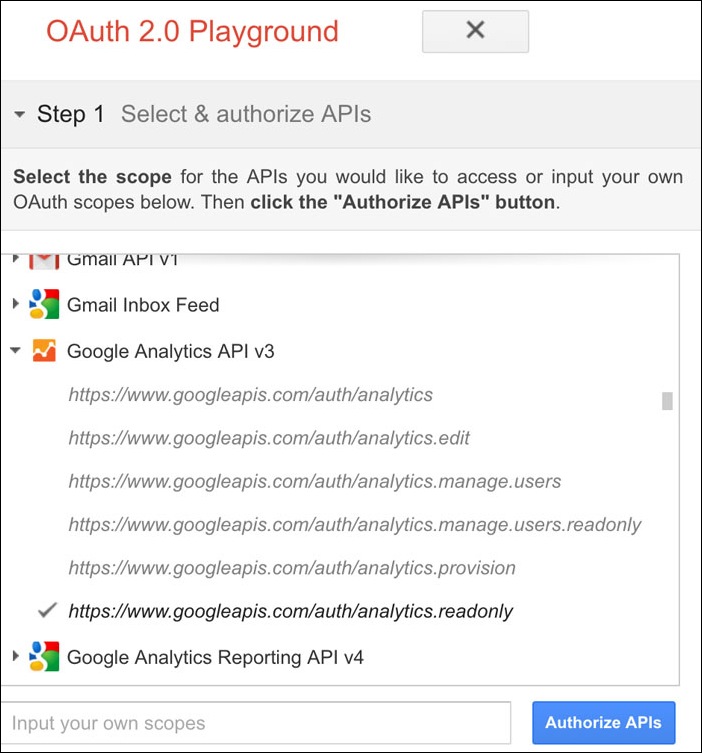
Then click on Step 1: Select & authorize APIs option on the left. Click on Google Analytics API V3. Just select one scope - https://www.googleapis.com/auth/analytics.readonly. We only need readonly access for real time data. Click on Authorize APIs button below.

google-authorize-api-oauth2

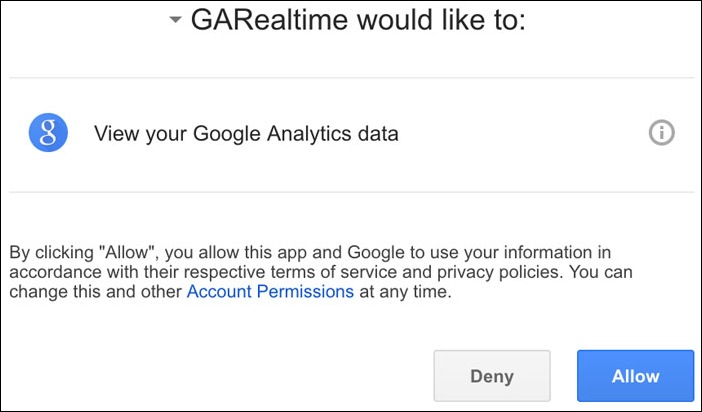
This will display the authorization screen for your client id. Click on Allow.

google-oauth2-allow-access-analytics

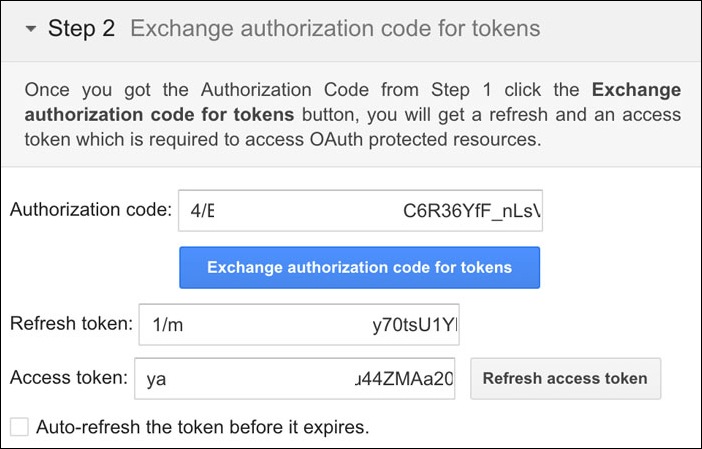
Authorization code will be displayed on the left window. Click on exchange authorization code for tokens. This will display refresh token and access token. We are not interested in access token since it will expire in an hour. Save the refresh token for later use.

oauth-tokens-google-playground

Now we have everything ready to programmatically access Google analytics real time API. We now have client id, client secret and refresh token ready.

Step 4: Create a Gradle Java Project

You can create the following gradle project from command line or from eclipse IDE. The following instructions assume that you have gradle installed on your system.

Create a simple Java project using gradle,

gradle init --type java-application

Replace the default build.gradle with the following file,

apply plugin: 'java'
apply plugin: 'application'

mainClassName = 'GARealTimeDisplay'


repositories {
    jcenter()
}

dependencies {
    compile 'com.google.apis:google-api-services-analytics:v3-rev136-1.22.0'
    compile 'com.google.oauth-client:google-oauth-client-jetty:1.22.0'

}

Create the following Java class in the default package (src/main/java subfolder).

import java.text.DateFormat;
import java.util.Date;
import java.util.List;

import com.google.api.client.auth.oauth2.Credential;
import com.google.api.client.googleapis.auth.oauth2.GoogleCredential;
import com.google.api.client.googleapis.javanet.GoogleNetHttpTransport;
import com.google.api.client.http.HttpTransport;
import com.google.api.client.json.JsonFactory;
import com.google.api.client.json.jackson2.JacksonFactory;
import com.google.api.services.analytics.Analytics;
import com.google.api.services.analytics.Analytics.Data.Realtime.Get;
import com.google.api.services.analytics.model.RealtimeData;

// Displays Google analytics real time users on console using Java.
// Uses refresh token generated from oAuth2 playground
// See http://www.quickprogrammingtips.com for more details.
public class GARealTimeDisplay {
    private static final String APPLICATION_NAME="GARealTimeDisplay";
    private static final String GA_PROPERTY_ID = "REPLACE THIS";
    private static final String GAPI_CLIENT_ID = "REPLACE THIS";
    private static final String GAPI_CLIENT_SECRET = "REPLACE THIS";
    private static final String GAPI_OAUTH_USER_REFRESH_TOKEN="REPLACE THIS";

    public static void main(String[] args) throws Exception {
        try {
            Analytics analytics = initializeAnalytics();
            System.out.println("The following display is refreshed every minute");
            while(true) {
                printRealTimeDisplay(analytics);
                Thread.sleep(60*1000); // wait for a minute!
            }
        } catch (Throwable e) {
            System.out.println("Error: " + e.getMessage());
        }
    }

    // Initialize google analytics api using client id/secret and user refresh token
    // client id/secret generated from developer API console
    // refresh token generated from google oauth 2 playground
    private static Analytics initializeAnalytics() throws Exception {
        JsonFactory jsonFactory = JacksonFactory.getDefaultInstance();
        HttpTransport httpTransport = GoogleNetHttpTransport.newTrustedTransport();

        Credential credential = new GoogleCredential.Builder().setTransport(httpTransport).setJsonFactory(jsonFactory)
                .setClientSecrets(GAPI_CLIENT_ID, GAPI_CLIENT_SECRET).build();

        credential.setRefreshToken(GAPI_OAUTH_USER_REFRESH_TOKEN);

        return new Analytics.Builder(httpTransport, jsonFactory, credential).setApplicationName(APPLICATION_NAME)
                .build();
    }

    // Display only the real time users to a site as reported by google analytics
    private static void printRealTimeDisplay(Analytics analytics) throws Exception {
        Get realtimeRequest = analytics.data().realtime().get("ga:" + GA_PROPERTY_ID, "rt:activeUsers");

        RealtimeData realtimeData = realtimeRequest.execute();
        String property = realtimeData.getProfileInfo().getProfileName();
        String time = DateFormat.getDateTimeInstance().format(new Date());       
        if (realtimeData.getTotalResults() > 0) {
            for (List<String> row : realtimeData.getRows()) {
                for (String element : row) {
                    System.out.println(time+":"+property+":Active Users:"+element);
                }
            }
        } else {
            System.out.println("No data received");
        }
    }
}

Replace the following constants in the Java class with actual values for your account.

  • GA_PROPERTY_ID - Google Analytics Property Number
  • GAPI_CLIENT_ID - Google Cloud Project Client ID
  • GAPI_CLIENT_SECRET - Google Cloud Project Client Secret
  • GAPI_OAUTH_USER_REFRESH_TOKEN - oAuth2 Refresh Token from Playground

Step 5: Run the Java Application

Using your IDE or from command line execute the gradle run task.

For linux/mac,

./gradlew run

For windows,

gradlew.bat

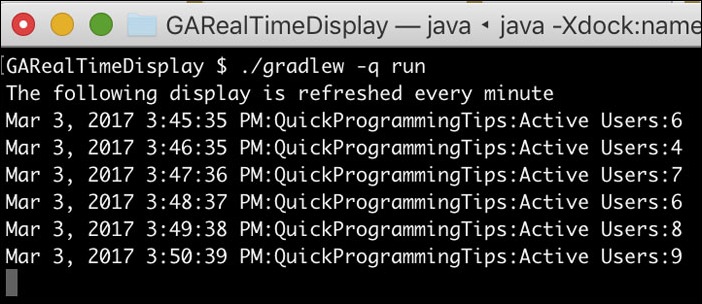
If everything goes well, real time visitors to your website will be displayed on the console every minute.

google-analytics-realtime-java-console

References

How to Develop JavaFX Programs Using Eclipse and Gradle

JavaFX is an excellent framework for building cross platform rich client applications in Java. Since JDK 7, JavaFX is bundled with the JDK distribution. The latest version of the framework (JavaFX 8) is available as part of the Java 8 distribution. I recommend that you update your Java 8 installation to the latest version so that all new features are available. For example, a number of new cool features were added in JDK8 u40.

Since JavaFX is part of JDK 8, you don't need any additional downloads when building JavaFX with eclipse. However there are still some minor configuration changes that you need to do to get JavaFX up and running with eclipse and gradle. We will cover those changes below.

Gradle is one of the best build systems available on the Java platform. More and more projects are being migrated from maven and ant to gradle. Follow the tutorial below to develop your first JavaFX application using eclipse IDE and gradle build system.

How to Develop a Hello World JavaFX Application Using Eclipse and Gradle

Step 1: Download and install JDK 8 for your platform. Verify the current JDK by running the following command in a command console,

java -version

Step 2: Download Eclipse IDE for Java Developers version 4.6.2 or above from this link. Extract the zip and click on the executable to verify that eclipse is up and running.

Eclipse 4.6.2 has built-in gradle support(buildship gradle plugin). However the default version installed on eclipse 4.6.2 is old(1.0.21.v20161010-1640). I recommend updating the buildship to version 2.x as explained below.

Step 3: Update buildship gradle plugin to 2.x. From eclipse menu, click on Help => Eclipse Marketplace. Search for buildship using the find field on top (click go). Click on the installed/install button for the buildship 2.x listed. It will take you to the installed tab. From this tab click on the update button.  This will update buildship to the latest version. Finally restart eclipse.

To verify Buildship 2.x installation, click on Help => Installation Details from eclipse menu. You should see buildship 2.x listed there.

Step 4: Create a JavaFX project using gradle. From the eclipse menu, click on File => New => Other. From the Gradle option, click on Gradle Project. Name the new gradle project as JavaFXDemo and click on Finish. Since this is the first project, gradle will download gradle 3.x libraries for the project.

The newly created project contains sample implementation files Library.java and LibraryTest.java. Delete them as you won't need it for the project.

Step 5: Writing your first JavaFX class. Type in the following simple JavaFX class. Save it as JavaFXDemo.java inside src/main/java folder of your project. In a real project, you may want your classes defined in custom packages.

import javafx.application.Application;
import javafx.scene.Scene;
import javafx.scene.control.Button;
import javafx.scene.layout.StackPane;
import javafx.stage.Stage;

// Simple Hello World JavaFX program
public class JavaFXDemo extends Application {
    public static void main(String[] args) {
        launch(args);
    }

    // JavaFX entry point
    @Override
    public void start(Stage primaryStage) throws Exception {
        String message = "Hello World!";
        Button btnHello = new Button();
        btnHello.setText(message);

        // A layout container for UI controls
        StackPane root = new StackPane();
        root.getChildren().add(btnHello);

        // Top level container for all view content
        Scene scene = new Scene(root, 300, 250);

        // primaryStage is the main top level window created by platform
        primaryStage.setTitle(message);
        primaryStage.setScene(scene);
        primaryStage.show();
    }
}

The above program uses JavaFX api to create a simple window and then adds a simple button with the message "Hello World!". The entry point to the program is the main method which in turn launches the JavaFX application. The launch method in turn invokes the start method (entry point of JavaFX application). Note that class gets all these features by extending the JavaFX Application class.

Whenever a start method is called, the JavaFX platform automatically passes in the top level window for the application called the primary stage. We create a button and then add it to the StackPane layout manager. We then add our UI layouts to the scene object which represents the visible part inside a window. Finally scene is added to the stage and stage is displayed.

Step 6: Configure the gradle build for JavaFX. When you open the JavaFXDemo.java in eclipse, you may see the following error.

Access restriction: The type 'Application' is not API (restriction on required library '/Library/Java/JavaVirtualMachines/jdk1.8.0_25.jdk/Contents/Home/jre/lib/ext/jfxrt.jar')

JavaFX is part of JDK7/JDK8. However it is added as an extension library to the JDK and is stored in jre/lib/ext folder. Eclipse correctly identifies that such library files may not be available in all Java VMs and hence prevents default access to the library. Even the code completion won't work.

Note that this is an Eclipse error. You can solve it by changing eclipse configuration or by installing e(fx)clipse plugin. But any changes made to eclipse configuration will be removed whenever you refresh the gradle project. Hence the best solution is to modify the eclipse configuration from gradle build file itself! Replace the default build.gradle in the project with the following file,

import org.gradle.plugins.ide.eclipse.model.AccessRule
apply plugin: 'java'
apply plugin: 'eclipse'

jar {
    manifest {
        attributes 'Main-Class': 'JavaFXDemo'
    }
}

eclipse {
    classpath {
        file {
            whenMerged {
                def jre = entries.find { it.path.contains 'org.eclipse.jdt.launching.JRE_CONTAINER' }
                jre.accessRules.add(new AccessRule('0', 'javafx/**'))
            }
        }
    }
}

repositories {
    jcenter()
}
dependencies {
}

From the eclipse IDE, right click the project and then click on Gradle => Refresh Gradle Project. This will remove library access restriction error from the eclipse editor and java completion will be now available for JavaFX classes!

Note that we have also removed the default guava and junit libraries from the gradle build file since we don't need them for this project.

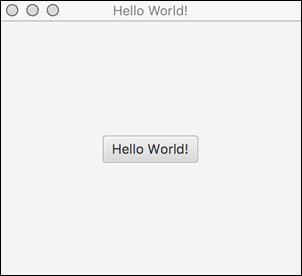
Step 7: Run your JavaFX application by right clicking the JavaFXDemo.java and then Run As => Java Application. The JavaFX application window will be displayed with a "Hello World!" button. You are now ready to start your JavaFX adventure with eclipse and gradle build system!

hello-world-in-javafx

References

Pregnancy Due Date Calculator in Java

There are number of ways to calculate pregnancy due date. The most common way is to add 280 days to the first day of the last menstrual period. For example, if the first day of last menstrual period is 10th February 2017, the estimated delivery date is 17th November 2017. Note that pregnancy due dates are approximate.

Java Program to Calculate Pregnancy Due Date (Java 8)

The following example program in Java predicts the pregnancy due date. This example is written in Java 8 using the new java.time.LocalDate class. This program also demonstrates the use of DateTimeFormatter for formatting date.

import java.time.LocalDate;
import java.time.format.DateTimeFormatter;
import java.util.Scanner;

// Java program to calculate pregnancy due date
public class PregnancyDueDateCalculator {

    public static void main(String[] args) throws Exception{
        System.out.print("Please enter first day of last menstrual period in YYYY-MM-DD: ");
        Scanner scanner = new Scanner(System.in);
        String input = scanner.nextLine();
        
        LocalDate date = LocalDate.parse(input);
        date = date.plusDays(280);
        
        DateTimeFormatter fmt = DateTimeFormatter.ofPattern("dd MMM yyyy");
        
        System.out.println("Pregnancy due date is: "+date.format(fmt));
    }
}

The sample output from the Java program is given below,

java PregnancyDueDateCalculator

Please enter first day of last menstrual period in YYYY-MM-DD: 2017-02-10

Pregnancy due date is: 17 Nov 2017

How to Use Spring Boot CLI

Spring boot cli is a command line tool available as part of the spring boot framework. This tool can be used to quickly create and run spring boot applications. Using spring boot cli you can,

  • Run spring controllers written in groovy directly on embedded tomcat server.
  • Package spring controllers written in groovy as a standalone executable jar.
  • Create a new starter spring boot project using the spring initializr service hosted here. This is one of the fastest ways to get started on a Java based microservices project.

Please note that this article uses Spring boot version 1.5.1.

Installing Spring Boot CLI

You can install spring boot cli in a number of ways (SDKMan, OSX Homebrew and MacPorts). For this article we will setup spring boot cli manually.

Step 1: Download the spring boot cli zip file from this link. Extract the contents of the zip file to a folder of your choice.

Step 2: Add the bin folder inside the spring boot cli to the PATH variable. For Windows run the following command (or permanently add the PATH at control panel => system => environment variables). Don't forget to replace <path to bin> with the actual path where you have extracted the spring boot cli!

set PATH = %PATH%;<path to bin>

In Linux or Mac, run the following command (or permanently add the PATH in bash profile),

export PATH = $PATH:<path to bin>

Step 3: Verify the version of spring boot cli by running the following command from the command line.

spring --version

Use the following commands to get help information,

spring help
spring help run

Using Spring Boot CLI

Spring boot cli can take concise controllers written in groovy language and then run them directly as a web application. This is probably the fastest way to prototype JSON based http microservices in Java.

Create a new file named helloworld.groovy in a new folder with the following content. This groovy controller creates an http endpoint at the root of a web application and then returns the hello world greeting in JSON format.

@RestController
class HelloWorld {

    @RequestMapping("/")
    Map home() {
        Map<String,String> greeting = new HashMap();
        greeting.put("greeting","Hello World!");
        return greeting;
    }
}

The above controller can be run as a web application using the following command,

spring run helloworld.groovy

The above command may take a while since it will download all the dependency jars before running the groovy file as a full fledged web application on an embedded tomcat server. Once the server is up and running check the JSON output either by accessing the URL http://localhost:8080 from a browser or by running the following command (linux/mac only),

curl http://localhost:8080

You have your JSON bases microservices application up and running in less than a minute! How cool is that!

If you look closely at the helloworld.groovy you will notice that it has no imports or main method. This is where the spring boot cli does its magic. It automatically adds a number of things by making some default assumptions,

  • Automatically adds dependencies by looking at code and annotations. Spring mvc and embedded tomcat libraries are automatically added due to the @RestController annotation.
  • Adds default import statements for commonly uses classes. In the above example it adds imports for RestController and RequestMapping.
  • Adds a wrapper application class with main method as the entry point to the application.

What if you want to convert the groovy controller classes as standalone executable jar files? This is required if you want to quickly host your application in the cloud. Well, spring boot cli has a command to create the fat jar containing all dependencies from the groovy controllers,

spring jar myapp.jar *.groovy

This creates a single jar containing compiled groovy classes with all dependencies added including the embedded tomcat. This jar can be directly executed from the command line,

java -jar myapp.jar

This starts the embedded tomcat and configures the web application enables all the controllers on the specified endpoints.

One problem with using spring run is that you don't have much control over the web application created. If you are working with a production spring boot application what you need is the initial starter project. Spring boot cli can be used to create the starter project,

spring init --dependencies=web --build=gradle myapp

This creates a spring boot starter project using gradle build system (If you don't specify the build type, a maven project will be created). To build and run this sample application, simply run the following command from the myapp folder newly created.

On linux/mac,

./gradlew bootRun

On windows,

gradlew.bat bootRun

To create a distributable jar file, run the following command,

./gradlew bootRepackage

The executable fat jar is available in build/libs folder of the new project.

Running Multiple Controllers

It is possible to pass multiple groovy files to spring boot cli. Just use the following command,

spring run *.groovy

References