Tutorial – Spring Boot Application Development Using STS

Spring Boot is a framework/tool suite for building spring based web applications. It has a set of tools for quick development/deployment of spring based applications. Using a set of default conventions it enables developers to quickly develop apps with very little configuration. It even has an embedded tomcat web server for quickly running applications as a standalone app!

Following are some of the main benefits of using Spring boot for web application development,

  • Quickly integrate various spring framework components such as Spring web MVC, Spring AOP, Spring ORM etc.
  • Quickly develop and run web applications using embedded Tomcat server.
  • Spring Tool Suite (STS) IDE has built-in support for building spring boot applications.

The following tutorial provides a step by step guide on starting spring boot web application development using spring tool suite (STS). This tutorial assumes that you already have Java JDK 1.8 or above installed in your machine. We also assume that the gradle build system (instead of maven) is used for developing applications.

Step 1: Install Spring Tool Suite (STS)

Spring Tool Suite is an eclipse based IDE designed for building spring applications. By default it comes with tools for quickly creating Spring boot applications.

You can download latest version of Spring Tool Suite (STS) from here. Downloads are available for Mac, Windows and Linux operation systems. Choose the version appropriate for your operating system. For this tutorial, I have downloaded STS 3.8.3 for Mac (based on Eclipse 4.6.2).

Extract the downloaded zip file into a folder of your choice. Run the STS executable to verify that STS is ready for development.

Step 2: Install Gradle BuildShip Plugin

STS has a built-in gradle plugin developed by SpringSource. However it is now preferred to use Buildship gradle plugin from Gradle Inc.

The latest version of Buildship is 2.x. However STS 3.8.3 has a bug which prevents it from working with Buildship 2.0 plugin. Hence if you are using STS 3.8.3, you need to install Buildship 1.x plugin. Note that for STS 3.8.4 (not released as of February 2017) or above you can use Buildship 2.0.

To install Buildship 1.x From STS, click on Help => Install New Software. In the work with field, add the URL to the Buildship 1.0.21 plug-in for Eclipse Neon. Install the Buildship 1.0.21 version listed.
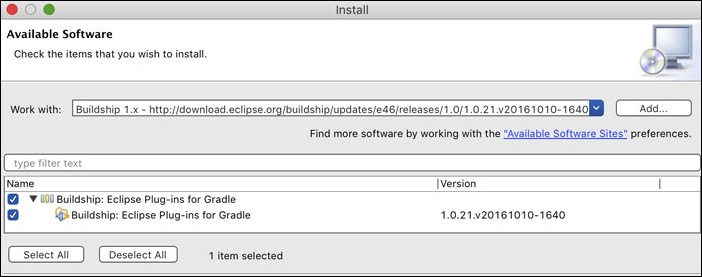
Installing Gradle BuildShip 1.x in STS

Note that if you haven't installed the Gradle Buildship plugin properly, you will get the following error when you try to create a spring starter project,

Can not import using Gradle (Buildship) because Buildship Gradle Tooling is not installed. You can install it from Eclipse Marketplace.

Step 3: Create a Spring Boot Starter Project

From STS, click on File => New => Project. Select Spring Starter Project as shown below and click next.
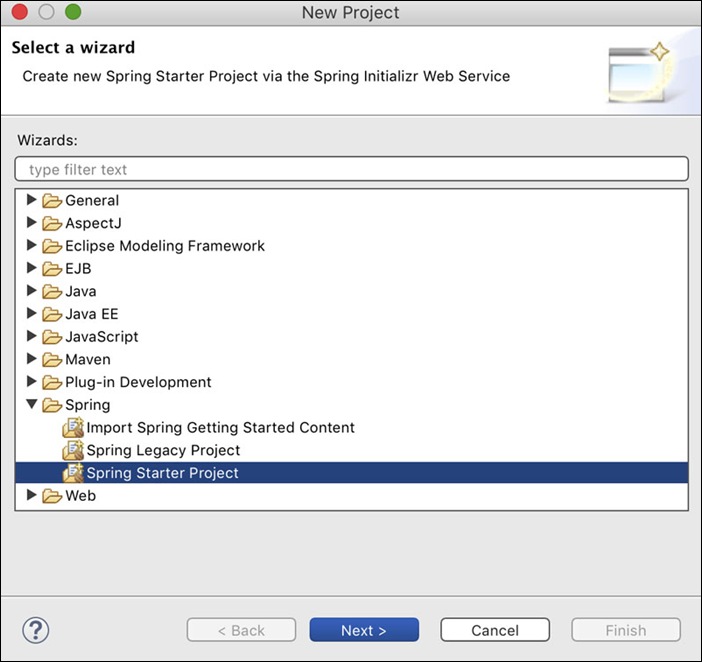
Using spring starter project in STS

In the next screen, enter the name of the application (DemoApp) and then select type as gradle (Buildship). Then you need to enter the various packaging parameters for your project. I have used the following values for this demo project. These values follow Maven conventions.

  • Group - com.quickprogrammingtips.demoapps
  • Artifact - demoapp
  • Version - 0.0.1-SNAPSHOT
  • Description - Spring Boot Demo App
  • Package - com.quickprogrammingtips.demoapps
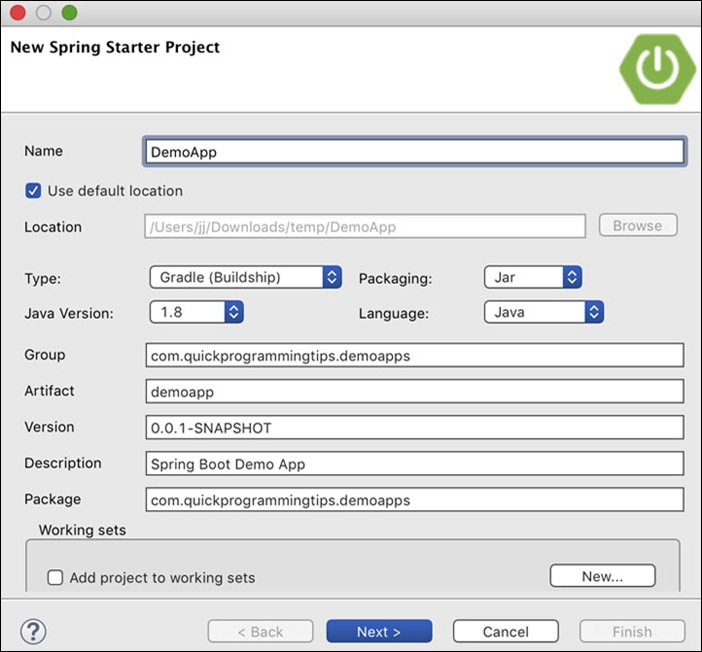
Configuring Spring Starter Project

Click next. In the next screen select the version of Spring Boot (1.5.1) for the project. You can also select various features you need as dependencies. For example, if you are using any of the core spring libraries such as AOP, you can select it under the core folder. In this tutorial we are building a simple Spring boot web application with spring web mvc. Hence we will only select web dependency under web folder as shown below,
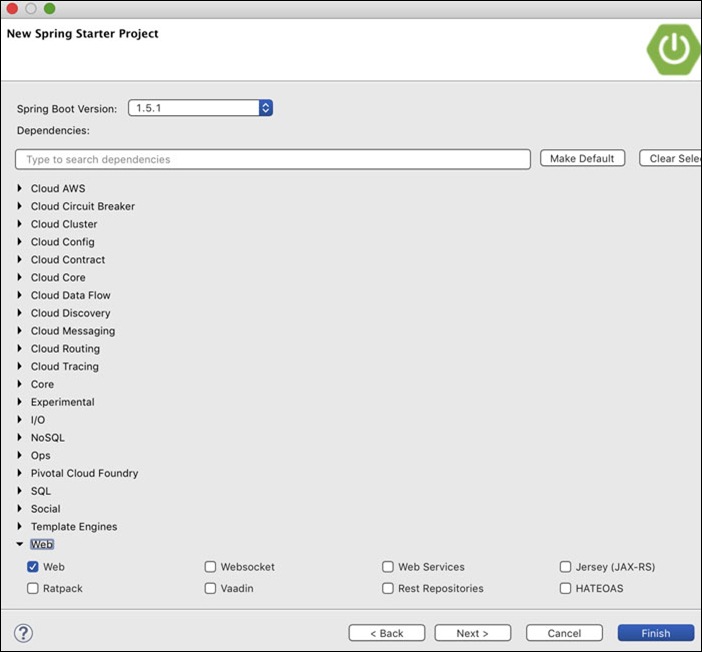
Configure Spring Starter Project

Click on finish. You now have a ready to run spring boot web application based on spring web mvc! The newly created spring boot application contains the following files,

  • DemoAppApplication.java - This is the entry point of the spring boot application.
  • build.gradle - This file contains gradle build configuration including all the dependencies of the project. There is only one dependency on spring-boot-starter-web which in turn has transitive dependencies on a number of projects including spring-web, spring-web-mvc, spring-boot-starter and spring-boot-starter-tomcat.

Following is the build.gradle contents,

buildscript {
    ext { 
        springBootVersion = '1.5.2.RELEASE'
    }
    repositories {
        mavenCentral() 
    }
    dependencies {
        classpath("org.springframework.boot:spring-boot-gradle-plugin:${springBootVersion}")
    } 
}

apply plugin: 'java'
apply plugin: 'eclipse'
apply plugin: 'org.springframework.boot'

jar {
    baseName = 'demoapp'
    version = '0.0.1-SNAPSHOT'
}

sourceCompatibility = 1.8

repositories {
    mavenCentral()
}


dependencies {
    compile('org.springframework.boot:spring-boot-starter-web')
    testCompile('org.springframework.boot:spring-boot-starter-test')
}

Step 4: Running the Spring Boot Project in STS

To run the newly created spring boot application, right click the project and select Run As => Spring Boot App. This actually calls the main method of the DemoAppApplication.java which in turn calls the SpringApplication.run method. Internally this method creates an instance of embedded Tomcat server at the default port of 8080 and runs application in it.

Open a browser window and enter the URL - http://localhost:8080/. You will see the following error from the Spring boot application.
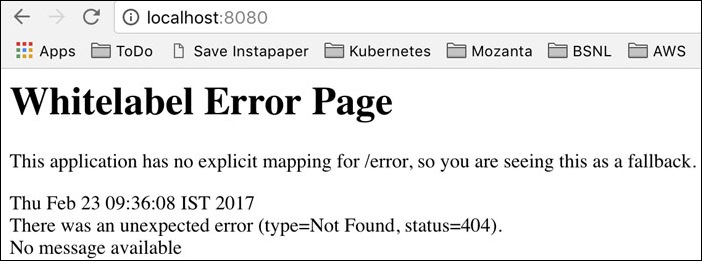
Spring Boot Error

You are getting this error since you haven't added any spring web mvc controllers to handle any web requests. Let us do that now!

Step 5: Responding to Web Requests in Spring Boot

Create a new class with the name HelloController.java under the same package where DemoAppApplication.java is located. Copy the following code,

package com.quickprogrammingtips.demoapps;

import org.springframework.stereotype.Controller;
import org.springframework.web.bind.annotation.RequestMapping;
import org.springframework.web.bind.annotation.ResponseBody;

@Controller
public class HomeController {
    @RequestMapping("/")
    @ResponseBody
    String home() {
        return "Hello World!";
    }
}

From console stop and rerun the application. Now access the URL http://localhost:8080/ again. You should see Hello World! printed on the browser. Congratulations!, you have created a web application using spring boot.

How do I return a JSON Output Using Spring Controllers?

These days most backend applications are written as microservices with JSON output. Returning JSON in spring web mvc is easy. Just wrap your output in an object with getter methods and spring will automatically convert it to JSON output. Here is the modified HomeController.java which returns Hello World! greeting as JSON output,

package com.quickprogrammingtips.demoapps;

import org.springframework.stereotype.Controller;
import org.springframework.web.bind.annotation.RequestMapping;
import org.springframework.web.bind.annotation.ResponseBody;

class Greeting {
	String greeting;
	Greeting(String g) {
		greeting = g;
	}
	public String getGreeting() {
		return greeting;
	}
}

@Controller
public class HomeController {
    @RequestMapping(value="/",produces = "application/json")
    @ResponseBody
    Object home() {
        return new Greeting("Hello World!");
    }
}

And voila! you now have microservice endpoints with JSON output!

References

How to Create Checksum Value in Java

A checksum is a small sized data created from a larger data set using an algorithm. If there is even a single change in the larger data set, the algorithm will create a different checksum value. This property can be used to verify the integrity of data. For example, you can host a large download on a website and then publish the checksum of the download on a separate location. Anyone downloading the file can regenerate the checksum and compare it with the published checksum. This reduces the risk of fake data, malware infected binaries etc.

Cryptographic hash functions such as MD5 and SHA256 can be used as the checksum function. These functions also ensure that two different data sets won't have the same checksum (no collision).

The following example Java program creates MD5 and SHA256 checksums from the given data. Note that SHA-1 algorithm is no longer recommended due to collision attacks possible (SHA-1 is broken). The following program also encodes the checksums into hexadecimal characters so that they are readable.

import java.security.MessageDigest;

import javax.xml.bind.DatatypeConverter;

// Creates MD5 and SHA-256 checksum in Java
public class ChecksumCalculator {

    public static void main(String[] args) {
        String data = "Hello World!";
        String md5Hash = getMD5Hash(data);
        String sha256hash = getSHA256Hash(data);
        
        System.out.println("data:"+data);
        System.out.println("md5:"+md5Hash);
        System.out.println("sha256:"+sha256hash);
    }

    // Java method to create SHA-25 checksum
    private static String getSHA256Hash(String data) {
        String result = null;
        try {
            MessageDigest digest = MessageDigest.getInstance("SHA-256");
            byte[] hash = digest.digest(data.getBytes("UTF-8"));
            return bytesToHex(hash); // make it printable
        }catch(Exception ex) {
            ex.printStackTrace();
        }
        return result;
    }

    // Java method to create MD5 checksum
    private static String getMD5Hash(String data) {
        String result = null;
        try {
            MessageDigest digest = MessageDigest.getInstance("MD5");
            byte[] hash = digest.digest(data.getBytes("UTF-8"));
            return bytesToHex(hash); // make it printable
        }catch(Exception ex) {
            ex.printStackTrace();
        }
        return result;
    }
    
    /**
     * Use javax.xml.bind.DatatypeConverter class in JDK to convert byte array
     * to a hexadecimal string. Note that this generates hexadecimal in lower case.
     * @param hash
     * @return 
     */
    private static String  bytesToHex(byte[] hash) {
        return DatatypeConverter.printHexBinary(hash).toLowerCase();
    }
}

The output of the program is given below. You should get the exact same checksum/hash.

data:Hello World!

md5:ed076287532e86365e841e92bfc50d8c

sha256:7f83b1657ff1fc53b92dc18148a1d65dfc2d4b1fa3d677284addd200126d9069

Verifying Checksum Using Commandline Tools

If you are on a mac machine, the following commands can be used to verify checksum.

md5 -s 'Hello World!'
echo -n 'Hello World!'|shasum -a 256

How to Use Java to Get a List of Running Processes in Linux

In linux, the ps command can be used to get a list of running processes. Type the following command in a linux console.

ps -e -o command

The above command prints all running processes including the processes owned by other users (as specified by the -e option). The -o command flag instructs ps to show only the command name in the output. The command name contains the full path to the command including any command line arguments passed to it. If you just need the command name only (no path and arguments) replace the command keyword with comm.

How to Get All Running Processes in Linux - Java Example

In Java, you can use the Runtime class to execute any linux command. The following sample program in Java shows the use of Runtime class to get a list of all running processes in linux.

import java.io.BufferedReader;
import java.io.InputStreamReader;

// Displays all running processes in linux.
public class ShowProcessesInLinux {

    public static void main(String[] args) throws Exception {
        printAllProcesses();
    }
    // Java example program to display the names of all running linux processes
    private static void printAllProcesses() throws Exception{
        // -e - show all processes including processes of other users
        // -o command - restrict the output to just the process name
        Process process = Runtime.getRuntime().exec("ps -e -o command");
        BufferedReader r =  new BufferedReader(new InputStreamReader(process.getInputStream()));
        String line = null;

        while((line=r.readLine())!=null) {
            System.out.println(line);
        }
    }
}

The ps command in linux is powerful and has many options. You can use various options to sort processes based on memory usage or cpu usage.

ps -e --sort=-pcpu -o pcpu,command

The above command lists all the processes sorted in the descending order of the cpu usage. Using the -o option, we can display only the cpu usage percentage and the full command for the process (including arguments and path).

ps -e --sort=-size -o size,command

The above command lists all the processes sorted in the descending order of the memory taken by the process. Using the -o option, we display only the memory usage and full command of the process. The memory displayed is in Kilobytes.

The following example Java program shows how we can use the above command to display the process with the highest cpu usage. This program itself may reported as the top cpu process since it is running when the ps command is executed!

import java.io.BufferedReader;
import java.io.InputStreamReader;

// Sample Java program to print highest CPU process in a linux system
// Note that this program itself may be reported as the top process!
public class TopCPULinuxProcess {

    public static void main(String[] args) throws Exception {
        printProcessWithHighestCPU();
    }

    // Java example program to print the name of the process with highest CPU usage in linux
    private static void printProcessWithHighestCPU() throws Exception {
        Process process = Runtime.getRuntime().exec("ps -e --sort=-pcpu -o pcpu,command");
        BufferedReader r =  new BufferedReader(new InputStreamReader(process.getInputStream()));
        String line = null;
        int rowCount = 1;
        while((line=r.readLine())!=null) {
            if(rowCount==2) break; //first row is header
            rowCount++;
        }
        line = line.trim(); // remove spaces in the beginning
        int firstSpacePos = line.indexOf(" ");
        String cpuUsage = line.substring(0, firstSpacePos);
        String processName = line.substring(firstSpacePos+1);
        System.out.println("Process with highest CPU="+processName);
        System.out.println("CPU%="+cpuUsage);
    }
}

The following Java program will print the top 5 processes with the highest memory usage. Please note that the reported memory usage may not be exact in linux,

import java.io.BufferedReader;
import java.io.InputStreamReader;

// Displays the top 5 processes with the highest memory usage in linux
public class Top5MemoryProcessesInLinux {
    public static void main(String[] args) throws Exception {
        printTop5MemoryProcesses();
    }

    // Java method to print top 5 processes with highest memory usage in linux
    private static void printTop5MemoryProcesses() throws Exception {
        Process process = Runtime.getRuntime().exec("ps -e --sort=-size -o size,command");
        BufferedReader r =  new BufferedReader(new InputStreamReader(process.getInputStream()));
        String line = null;
        int rowCount = 0;
        while((line=r.readLine())!=null) {
            System.out.println(line);
            rowCount++;
            if(rowCount>5) break; // note that first line is the header
        }
    }
}

The following sample Java program will print verbose information about all the processes running in a linux system,

import java.io.BufferedReader;
import java.io.InputStreamReader;

// Displays a verbose report of all running processes in linux.
public class VerboseProcessReportInLinux {
    public static void main(String[] args) throws Exception {
        printVerboseProcessReport();
    }

    // Java program to print verbose process information.
    private static void printVerboseProcessReport() throws Exception {
        Process process = Runtime.getRuntime()
                .exec("ps -e --sort=-pcpu -o pcpu,size,flags,lim,lstart,nice,rss,start,state,tt,wchan,command");
        BufferedReader r = new BufferedReader(new InputStreamReader(process.getInputStream()));
        String line = null;

        while ((line = r.readLine()) != null) {
            System.out.println(line);
        }
    }
}

The above examples should work in common linux distributions such as Xubuntu, Ubuntu, CentOS, Fedora, OpenSUSE and Debian.

References

How to Use CommandLineRunner in Spring Boot Application

CommandLineRunner is a simple spring boot interface with a run method. The run method of all beans implementing the CommandLineRunner interface will be called automatically by the spring boot system after the initial boot. To see CommandLineRunner in action, just add the following class to your existing Spring Boot Application. When you run your application, you will see the run method output in the console.

package com.example;
import java.util.Arrays;
import org.springframework.boot.CommandLineRunner;
import org.springframework.stereotype.Component;

@Component
public class MyCommandLineRunner implements CommandLineRunner{

    @Override
    public void run(String... args) throws Exception {
        System.out.println("Hello From MyCommandLineRunner");
        System.out.println("Printing all comandline arguments");
        System.out.println(Arrays.toString(args));   
    }
}

The spring boot console shows that the run method of MyCommandLineRunner is executed automatically.

commandlinerunner in spring boot

Spring component scanner picks up all the CommandLineRunner implementations and automatically executes run method inside them. The command  line parameters to spring boot is passed as parameters to the run method. If you want ordering of multiple CommandLineRunner instances, you need to implement the @Ordered interface. The following CommandLineRunner implementations demonstrate the use of @Ordered interface.

package com.example;

import org.springframework.boot.CommandLineRunner;
import org.springframework.core.Ordered;
import org.springframework.stereotype.Component;

@Component
public class FirstCommandLineRunner implements CommandLineRunner, Ordered {

    @Override
    public void run(String... args) throws Exception {
        System.out.println("Running First CommandLineRunner");

    }

    @Override
    public int getOrder() {
        return 1;
    }
}


package com.example;

import org.springframework.boot.CommandLineRunner;
import org.springframework.core.Ordered;
import org.springframework.stereotype.Component;

@Component
public class SecondCommandLineRunner implements CommandLineRunner, Ordered {

    @Override
    public void run(String... args) throws Exception {
        System.out.println("Running Second CommandLineRunner");
    }

    @Override
    public int getOrder() {
        return 2;
    }
}

Run the spring boot and verify that run methods are executed in the specified order.

order-commandlinerunner-spring-boot

References

How to Check Even or Odd in Java

The following sample Java program shows how the modulus operator in Java can be used to check whether a given number is even or odd. The following program reads a number from the console using the Scanner class and System.in input stream,

import java.util.Scanner;

// Java program to check whether a number is even or odd.
public class EvenOrOdd {
    public static void main(String[] args) {
        System.out.println("Please enter a number");
        Scanner scanner = new Scanner(System.in);

        int input = scanner.nextInt();

        if (input % 2 == 0) {
            System.out.println(input + " is an even number");
        } else {
            System.out.println(input + " is an odd number");
        }

        scanner.close();
    }
}

Compile the program,

javac EvenOrOdd.java

Run the program

java EvenOrOdd