How to Develop JavaFX Programs Using Eclipse and Gradle
JavaFX is an excellent framework for building cross platform rich client applications in Java. Since JDK 7, JavaFX is bundled with the JDK distribution. The latest version of the framework (JavaFX 8) is available as part of the Java 8 distribution. I recommend that you update your Java 8 installation to the latest version so that all new features are available. For example, a number of new cool features were added in JDK8 u40.
Since JavaFX is part of JDK 8, you don't need any additional downloads when building JavaFX with eclipse. However there are still some minor configuration changes that you need to do to get JavaFX up and running with eclipse and gradle. We will cover those changes below.
Gradle is one of the best build systems available on the Java platform. More and more projects are being migrated from maven and ant to gradle. Follow the tutorial below to develop your first JavaFX application using eclipse IDE and gradle build system.
How to Develop a Hello World JavaFX Application Using Eclipse and Gradle
Step 1: Download and install JDK 8 for your platform. Verify the current JDK by running the following command in a command console,
Step 2: Download Eclipse IDE for Java Developers version 4.6.2 or above from this link. Extract the zip and click on the executable to verify that eclipse is up and running.
Eclipse 4.6.2 has built-in gradle support(buildship gradle plugin). However the default version installed on eclipse 4.6.2 is old(1.0.21.v20161010-1640). I recommend updating the buildship to version 2.x as explained below.
Step 3: Update buildship gradle plugin to 2.x. From eclipse menu, click on Help => Eclipse Marketplace. Search for buildship using the find field on top (click go). Click on the installed/install button for the buildship 2.x listed. It will take you to the installed tab. From this tab click on the update button. This will update buildship to the latest version. Finally restart eclipse.
To verify Buildship 2.x installation, click on Help => Installation Details from eclipse menu. You should see buildship 2.x listed there.
Step 4: Create a JavaFX project using gradle. From the eclipse menu, click on File => New => Other. From the Gradle option, click on Gradle Project. Name the new gradle project as JavaFXDemo and click on Finish. Since this is the first project, gradle will download gradle 3.x libraries for the project.
The newly created project contains sample implementation files Library.java and LibraryTest.java. Delete them as you won't need it for the project.
Step 5: Writing your first JavaFX class. Type in the following simple JavaFX class. Save it as JavaFXDemo.java inside src/main/java folder of your project. In a real project, you may want your classes defined in custom packages.
import javafx.application.Application;
import javafx.scene.Scene;
import javafx.scene.control.Button;
import javafx.scene.layout.StackPane;
import javafx.stage.Stage;

// Simple Hello World JavaFX program
public class JavaFXDemo extends Application {
    public static void main(String[] args) {
        launch(args);
    }

    // JavaFX entry point
    @Override
    public void start(Stage primaryStage) throws Exception {
        String message = "Hello World!";
        Button btnHello = new Button();
        btnHello.setText(message);

        // A layout container for UI controls
        StackPane root = new StackPane();
        root.getChildren().add(btnHello);

        // Top level container for all view content
        Scene scene = new Scene(root, 300, 250);

        // primaryStage is the main top level window created by platform
        primaryStage.setTitle(message);
        primaryStage.setScene(scene);
        primaryStage.show();
    }
}
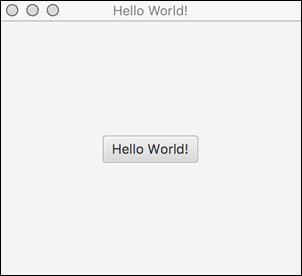
The above program uses JavaFX api to create a simple window and then adds a simple button with the message "Hello World!". The entry point to the program is the main method which in turn launches the JavaFX application. The launch method in turn invokes the start method (entry point of JavaFX application). Note that class gets all these features by extending the JavaFX Application class.
Whenever a start method is called, the JavaFX platform automatically passes in the top level window for the application called the primary stage. We create a button and then add it to the StackPane layout manager. We then add our UI layouts to the scene object which represents the visible part inside a window. Finally scene is added to the stage and stage is displayed.
Step 6: Configure the gradle build for JavaFX. When you open the JavaFXDemo.java in eclipse, you may see the following error.
Access restriction: The type 'Application' is not API (restriction on required library '/Library/Java/JavaVirtualMachines/jdk1.8.0_25.jdk/Contents/Home/jre/lib/ext/jfxrt.jar')
JavaFX is part of JDK7/JDK8. However it is added as an extension library to the JDK and is stored in jre/lib/ext folder. Eclipse correctly identifies that such library files may not be available in all Java VMs and hence prevents default access to the library. Even the code completion won't work.
Note that this is an Eclipse error. You can solve it by changing eclipse configuration or by installing e(fx)clipse plugin. But any changes made to eclipse configuration will be removed whenever you refresh the gradle project. Hence the best solution is to modify the eclipse configuration from gradle build file itself! Replace the default build.gradle in the project with the following file,
import org.gradle.plugins.ide.eclipse.model.AccessRule
apply plugin: 'java'
apply plugin: 'eclipse'

jar {
    manifest {
        attributes 'Main-Class': 'JavaFXDemo'
    }
}

eclipse {
    classpath {
        file {
            whenMerged {
                def jre = entries.find { it.path.contains 'org.eclipse.jdt.launching.JRE_CONTAINER' }
                jre.accessRules.add(new AccessRule('0', 'javafx/**'))
            }
        }
    }
}

repositories {
    jcenter()
}
dependencies {
}
From the eclipse IDE, right click the project and then click on Gradle => Refresh Gradle Project. This will remove library access restriction error from the eclipse editor and java completion will be now available for JavaFX classes!
Note that we have also removed the default guava and junit libraries from the gradle build file since we don't need them for this project.
Step 7: Run your JavaFX application by right clicking the JavaFXDemo.java and then Run As => Java Application. The JavaFX application window will be displayed with a "Hello World!" button. You are now ready to start your JavaFX adventure with eclipse and gradle build system!
