Spring 4 Hello World Example With Java Configuration
Spring framework is a lightweight, modular and non-invasive application framework for building java applications. Older versions of spring framework required verbose XML files for configuring java beans. Since spring 3.0, bean configuration can be specified in java code itself and is commonly know as java config(java configuration). Now it is possible to build a full fledged spring application without a single line of XML!
The following example shows how java config and annotations can be used to build a simple hello world program using spring dependency injection. This example requires the following tools,
- Java 8
- Spring framework 4.3.7.RELEASE or above
- Spring Tool Suite (With Gradle 3.4) 3.8.4.RELEASE or above
Ensure that you have java 8 on your system. To verify availability of java 8, run the following command from console,
If you don't have java 8 installed, download it from here.
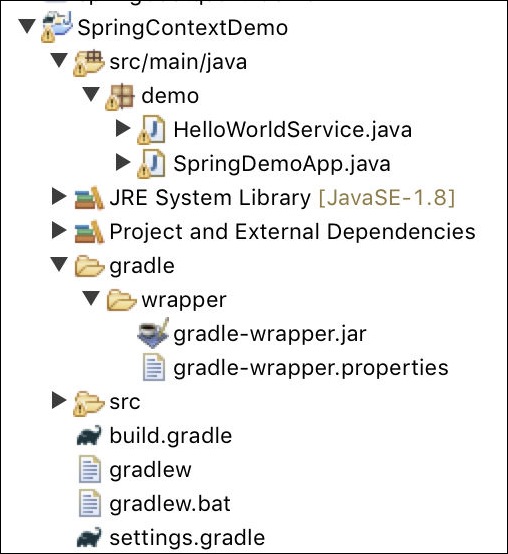
Step 1: Create a simple gradle java project from spring tool suite. Delete any java classes created under src/main/java and src/test/java folders.
Step 2: Create a java class to represent our service layer. In this example, we will write a very simple service class named HelloWorldService(in demo package) with a simple method to write "Hello World!" to the console. Save HelloWorldService.java in src/main/java/demo folder. Note the use of @Service annotation which tells framework that this is a component and its lifecycle must be managed by spring IoC container.
HelloWorldService.java
package demo;

import org.apache.commons.logging.Log;
import org.apache.commons.logging.LogFactory;
import org.springframework.stereotype.Service;

@Service
public class HelloWorldService {
    public static final Log LOG = LogFactory.getLog(HelloWorldService.class);

    public void sayHello() {
        LOG.info("Hello World!");
    }
}
Step 3: Create a java class to represent entry point to our application. In this example, we will name it as SpringDemoApp under demo package. We will also annotate this class with @Configuration and @ComponentScan. The @Configuration tells the spring framework that SpringDemoApp contains bean definitions and @ComponentScan tells spring framework to look for beans in the project and register them automatically. Spring looks for annotations such as @Component, @Service and even @Configuration to identify classes which are managed bean components. Hence SpringDemoApp and HelloWorldService are automatically added as managed beans.
Note the use of @Autowired on the HelloWorldService member variable in SpringDemoApp. This tells the spring framework to provide an instance of HelloWorldService if it has one. Spring already knows about the HelloWorldService bean through the @Service annotation. When the main method is called, SpringDemoApp initializes the spring framework which in turn loads all the beans and processes any dependency injection required. We call the injected HelloWorldService to print hello world message on the console.
SpringDemoApp.java
package demo;

import org.springframework.beans.factory.annotation.Autowired;
import org.springframework.context.ApplicationContext;
import org.springframework.context.annotation.AnnotationConfigApplicationContext;
import org.springframework.context.annotation.ComponentScan;
import org.springframework.context.annotation.Configuration;

@Configuration
@ComponentScan
public class SpringDemoApp {

    // This will be created and injected by spring IoC
    @Autowired
    private HelloWorldService hello;

    public static void main(String[] args) {
        ApplicationContext context = getAppContext();

        SpringDemoApp app = context.getBean("springDemoApp", SpringDemoApp.class);
        app.runApp();
    }

    public void runApp() {
        hello.sayHello();
    }

    public static ApplicationContext getAppContext() {
        ApplicationContext context = new AnnotationConfigApplicationContext(SpringDemoApp.class);
        return context;
    }
}
The default name of a bean configured by spring is the name of the class with first letter changed to lowercase. This is why getBean uses the name "springDemoApp" to refer to SpringDemoApp bean instance. Note that we have used a package name for our classes. Component scan has issues with default package and if you create your classes without a package you may see the following error,
Caused by: java.lang.IllegalArgumentException: @EnableAsync annotation metadata was not injected
Step 4: Replace the build.gradle with the following one. We simply indicate that this is a runnable Java application with dependency on spring-context 4.3.7.RELEASE. This in turn transitively adds spring-core and spring-beans projects.
build.gradle
apply plugin: 'application'

mainClassName = "demo.SpringDemoApp"

repositories {
    jcenter()
}

dependencies {
    compile 'org.springframework:spring-context:4.3.7.RELEASE'
}
Step 5: From the gradle tasks window in STS, execute the gradle application/run task. If everything goes well, Hello World! will be printed on the console.
In the above example we have used @Configuration, but it is not needed since we haven't programmatically defined any beans. We need it if we define our HelloWorldService using the @Bean annotation in the SpringDemoApp.java as shown below,
@Bean
public HelloWorldService getHello() {
    return new HelloWorldService();
}
In this case we can remove @Service and @ComponentScan annotations. Why? @Configuration already tells spring that SpringDemoApp is a bean and @Bean tells it that HelloWorldService is a bean. Hence we don't need @Service and @ComponentSCan. It is also possible to use a mix of @ComponentScan and @Bean annotations in a single program.
The following picture shows the hello world project structure in spring tool suite,
