How to Get All Indexes in a MongoDB Database as a Script

When you have collections with large amount of data, it is very important to create proper indexes. MongoDB queries can be substantially faster with proper indexes created on collections to meet the application needs of data sorting and filtering. MongoDB automatically creates a uniq index on the _id field during the creation of the collection. All other indexes must be manually created.

Sometimes programmers don't maintain a separate script for all the indexes they create during the project. To resolve performance issues, they may create indexes directly on the database without adding them to a separate script file. This is a bad practice since when a similar database is created for testing purposes, it may be missing some important indexes causing all kinds of all application errors. In such situations, the following script will be handy to extract all indexes in a running MongoDb database.

The output of the following MongoDB script itself is a MongoDB script that can be executed on a different database instance to recreate all indexes. I will also recommend committing the output to your version control system and mandate developers to update it before applying an index on the database. You can also use the script to compare indexes on database in different environments such as dev, sit, uat and production.

How to Export All Indexes in a MongoDB Database as a script

// iterate through every collection in MongoDB database
db.getCollectionNames().forEach(function(collection) {
    var indexes = db.getCollection(collection).getIndexes();
    // now iterate through every index in the collection
    indexes.forEach(function(index) {
        // we don't need these as it will be auto created
        delete index.v;delete index.ns;
        var key = index.key;
        delete index.key
        var options = {};
        // let us also copy all options associated with the index
        // index property unique is an example
        for (var option in index) {
            options[option] = index[option]
        }
        // Create script output
        print("db.getCollection(\""+collection+"\").createIndex("+tojson(key)+", "+tojson(options)+");");
    });
});

You can run the above script as a file using MongoDB shell or you can simply copy paste and run the same on a MonogDB client such as RoboMongo. The output can be saved as a script file for creating indexes of the database.

Sometimes you may want to apply indexes on an existing collection to a copy of the collection on the same database. In such cases you can use the following script. You need to replace the collection names c1 and c2 with actual names of the collections in your database. Note the use of background option (only needed in MongoDB versions less than 4.2) to ensure that the index creation do not block operations on the collection.

How to Copy Indexes from One Collection to Another in MongoDB?

var indexes = db.c1.getIndexes();
// now iterate through every index in the collection
indexes.forEach(function(index) {
    // we don't need these as it will be auto created
    delete index.v;delete index.ns;
    var key = index.key;
    delete index.key
    var options = {};
    // let us also copy all options associated with the index
    // index property unique is an example
    for (var option in index) {
        options[option] = index[option]
    }
    // Copy indexes to a new collection!
    db.c2.createIndex(key, options);
});

Please note that all the examples given are tested on MongoDB 3.6. These scripts should also work if you are using MongoDB 3.6 API on an Azure CosmosDB database.
How to Create and Use Indexes in MongoDB Database

MongoDB supports creation of indexes to speed up queries for specific application needs. With suitable indexes, MongoDB doesn't need to scan every document before returning results. This substantially speeds up queries especially for large collections where ordering and filtering is needed. MongoDB automatically creates a uniq index on the _id field during the creation of the collection. All other indexes must be manually created.

MongoDB indexes are created on a single field or a combination of fields and you can specify ascending or descending order for the index. In the following example I will use a typical use of a collection which is used to store customer data of a CRM system. First let us see how adding a simple index on a single collection field can substantially improve query performance.

Creating and Using Single Field Indexes in MongoDB

Our application uses a collection named customer to store customer data. Let us first create the collection using MongoDB JavaScript commands,

// create a customer collection
db.createCollection("customer");

Let us now insert some test data into the collection. The following script uses a loop to create 100,000 customer records in the collection. Each record contains customer name and age. We simulate different ages using modulus operator on the loop index. This ensures that customer ages are between 10 and 100.

// Create a large customer data set!
for(i=1;i<=100000;i++) {
    db.customer.insert({ name:"jack"+i, age:i%90+10 });
};

Let us now run a query to get the list of customers in the ascending order of their age,

// display all customers in ascending order of age. 
db.customer.find().sort( { age: 1 } )

In my machine, the above query took about 0.22 seconds. For a single query this may not seem much, but when multiple queries are run by different users, this becomes a major bottleneck on the database.

Let us now create an ascending index on the age column which we are using in the above sort query.

// We create an index on age to speed up sorted query on age
db.customer.createIndex( { age: 1 } )

Now let us now run the sort query again.

// display all customers in ascending order of age. This uses our index.
db.customer.find().sort( { age: 1 } )

This time the query took about 0.002 seconds to run. The query is now more than 100 times faster! Hence it is very important that you have proper indexes on your MongoDB tables especially when you are building a system for large number of application users with fairly large data. The advantage is substantially high when you have large documents in the collection.

Note that in the above example the order of the index doesn't matter. This is because for single field indexes like the one above on age, MongoDB can traverse the index in either direction. However order of index does matter in the case of compound indexes containing multiple fields.

Creating and Using Multi-Field Indexes in MongoDB

Let us know explore a much complex scenario involving compound indexes and multiple sort columns. We will start with an application scenario and see how multiple compound indexes can improve queries substantially.

In our e-commerce application, we have a collection for storing all the retail stores of the company. For simplicity, assume that the collection contains store name, store country and store city. If you consider this as a global retailer, there will be thousands of stores in the collection. Let us create the collection and then add 50,000 stores with random data,

// create a store collection
db.createCollection("store");
// Create a large store data set! 
//For the test data, we randomly create 2 letter strings 
//for country names and randomly create 8 letter strings 
//for city names.
for(i=1;i<=50000;i++) {
    var charset = "abcdefghijklmnopqrstuvwxyz";
    var city = ""; var country="";
    for( var j=0; j < 2; j++ )
        country += charset[Math.floor(Math.random() * charset.length)];
    for( var j=0; j < 8; j++ )
        city += charset[Math.floor(Math.random() * charset.length)];
    db.store.insert({ name:"store"+i, country:country, city: city });
};

In our e-commerce application, we are displaying the list of stores which is sorted first with country name and then with city name in ascending alphabetical order. The query is given below,

db.store.find().sort( { country: 1, city:1 } )

This query takes about 0.18 seconds in my machine. To improve the query performance, I added the following compound index which contains both country and city. I also indicate that the sort order for index is ascending for both fields.

db.store.createIndex( { country: 1, city:1 } )

With this index in place, my original query is run again,

db.store.find().sort( { country: 1, city:1 } )

This time the query taken less than 0.003 seconds! A huge improvement. Now application requires the store listing to be first sorted on the descending order of country followed by descending order of city name. The new query is given below,

db.store.find().sort( { country: -1, city:-1 } )

This time also the query taken less than 0.003 seconds! This means our index is also working even when reverse sort oder for both fields.

Now let us try running the query with ascending order of country followed by descending order of city name.

db.store.find().sort( { country: 1, city:-1 } )

This time query performance is back to non indexed behavior. Our compound index is no longer working for this scenario. We need to create another compound index given below,

db.store.createIndex( { country: 1, city:-1 } )

With this index also in place, now the queries are faster even with all 4 combinations of the sort order for country name and city name.

Now let us see what happens if you use only one of the fields of compound index in your sort order.

db.store.find().sort( { country: 1 } )

It is fast! This query also uses compound index even when the sort query uses only country field. This is because in MongoDB, compound indexes work even when only index prefixes(one or more first parts of a compound index) are used in the sort query.

However, the following queries are still slower since you are running the sort query on the second city name field (NOT an index prefix).

db.store.find().sort( { city: 1 } )
db.store.find().sort( { city: -1 } )

For the above query to work faster, you need to add the following index,

db.store.createIndex( { city:1 } )

So if we need all sort order combinations in our application, we will need the following indexes,

db.store.createIndex( { city:1 } )
db.store.createIndex( { country: 1, city:-1 } )
db.store.createIndex( { country: 1, city:1 } )

MongoDB supports following types of indexes - single field, compound index, multi-key index, geospatial index, text index and hashed index. Indexes can have different properties as well. See this page for more details. Also note that any kind of index increases storage needs of your MongoDB instance.

Please note that all the examples given above are tested on MongoDB 3.6. These scripts should also work if you are using MongoDB 3.6 API on a CosmosDB database. In the earlier version of CosmosDB (using MongoDB API 3.2), all top level fields were auto indexed. But this is no longer the case in newer CosmosDB versions. Hence it is important to identify and create indexes as needed in your application features.

How to Draw a Chessboard in HTML Canvas Using JavaScript

The canvas HTML element provides a bitmap area for graphics drawing. The canvas was standardized across various browsers in the HTML5 specification. Using JavaScript, we can draw 2D/3D images and animation on a canvas. Almost all modern browsers support canvas. With a hardware accelerated browser, Canvas can produce fast 2D graphics.

The following tutorial is intended as an introduction to Canvas 2D drawing using JavaScript. We will draw a chess board using some of the basic drawing primitives available on the canvas element. See the Mozilla canvas tutorial for a detailed look at the canvas API.

Let us create a simple HTML file(index.html) which contains the canvas element. Using the script tag, we will import the the JavaScript file(chess.js) containing the drawing commands for chessboard. When the HTML file is opened in a browser, the onload event on the body tag is triggered. This in turn calls the JavaScript method drawChessboard() defined in the script tag of the HTML page. The full source code of the index.html is given below.

<html>
  <head>
    <meta charset="UTF-8">
    <title>Draw Chess Board</title>
    <script src="chess.js"></script>
  </head>
  <body onload="drawChessboard()">
    <canvas id="canvasChessboard" width="800px" height="500px"></canvas>
  </body>
</html>

Let us now create chess.js which contains the JavaScript code for drawing the chessboard. Ensure that you have chess.js and index.html in the same folder. The full source code of chess.js is given below,

function drawChessboard() {
  // size of each chess square
  const squareSize = 50;
  // position of board's top left
  const boardTopx = 50;
  const boardTopy = 50;
  let canvas = document.getElementById("canvasChessboard");
  context = canvas.getContext("2d");
  for(let i=0; i<8; i++) {
    for(let j=0; j<8; j++) {
      context.fillStyle = ((i+j)%2==0) ? "white":"black";
      let xOffset = boardTopx + j*squareSize;
      let yOffset = boardTopy + i*squareSize;
      context.fillRect(xOffset, yOffset, squareSize, squareSize);
    }
  }
  // draw the border around the chessboard
  context.strokeStyle = "black";
  context.strokeRect(boardTopx, boardTopy, squareSize*8, squareSize*8)
} 

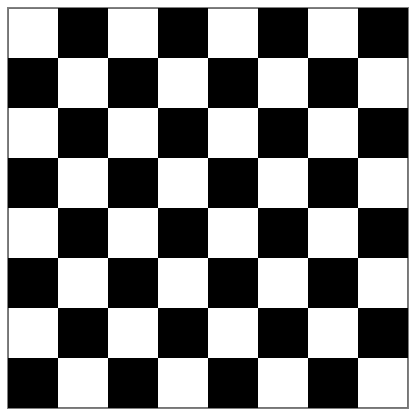
The drawChessboard() method gets a reference to the canvas element using the getElementById() method. We then create a 2d drawing context using the getContext() method of canvas object. Finally a nested loop draws all the 64 squares of the chess board. The squares are drawn using white or black color depending on the position of the square in the board.

The final output of the chessboard drawing JavaScript code is given below,
chessboard in javascript

How to Draw Rectangles and Squares Using Python Turtle

Python's turtle package can be used to draw various shapes on a canvas. Turtle allows the programmer to move a pen in a specified direction by specifying its heading and distance. Turtle has no built-in primitive for drawing a rectangle or square. However it is easy to create a function to draw a rectangle(or square) in turtle.

The following python program defines a custom function for drawing rectangles using turtle. Note that the centre of the turtle canvas is at 0,0. Hence if you draw just a dot at (0,0) it will be at the centre of the drawing canvas. The function draw_rectangle() requires the co-ordinates of the top left of the rectangle. You also need to specify width, height, thickness and color of the rectangle.

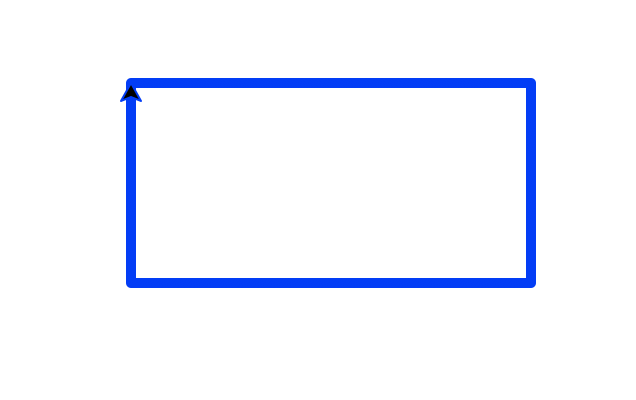
The following example draws a blue rectangle which is 200 pixels in width and 100 pixels in height. We have specified the top left of the rectangle as (-100,50) to position the rectangle at the centre of the canvas. The rectangle drawn has a thickness of 5 pixels.

import turtle
turtle.setup(500,500)
board = turtle.Turtle()

# draws a rectangle given top left position of a rectangle
def draw_rectangle(board,x,y,width,height,size,color):
  board.pencolor(color)
  board.pensize(size)
  board.setheading(0)

  board.up()
  board.goto(x,y)
  board.down()
  # draw top
  board.forward(width)
  # draw right
  board.right(90)
  board.forward(height)
  # draw bottom
  board.right(90)
  board.forward(width)
  # draw left
  board.right(90)
  board.forward(height)
  board.end_fill()


# in turtle, the centre of the canvas is 0,0
# hence we position the rectangle in the center
# note that we need to pass the top left co-ordinates of rectangle
# draws rectangle with 200 pixels in width and 100 pixels in height
draw_rectangle(board,-100,50,200,100,5,"blue")
turtle.done()

The following the sample output from the program,

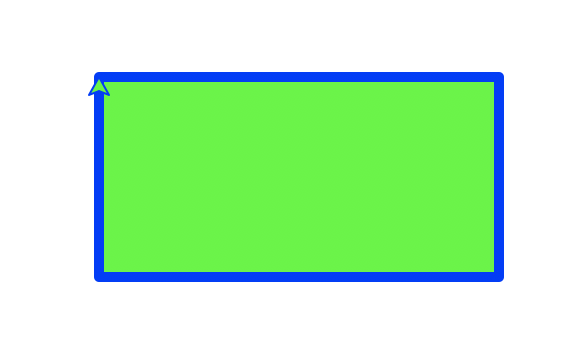
Following python program is a different version which also allows us to specify a fill color for the rectangle. The example is identical to the previous one except that we use a different color to fill the rectangle.

import turtle
turtle.setup(500,500)
board = turtle.Turtle()

# draws a rectangle given top left position of a rectangle
def draw_filled_rectangle(board,x,y,width,height,size,color,fill):
  board.fillcolor(fill)
  board.pencolor(color)
  board.pensize(size)
  board.setheading(0)

  board.begin_fill()
  board.up()
  board.goto(x,y)
  board.down()
  # draw top
  board.forward(width)
  # draw right
  board.right(90)
  board.forward(height)
  # draw bottom
  board.right(90)
  board.forward(width)
  # draw left
  board.right(90)
  board.forward(height)
  board.end_fill()


# in turtle, the centre of the canvas is 0,0
# hence we position the rectangle in the center
# note that we need to pass the top left co-ordinates of rectangle
# draws rectangle with 200 pixels in width and 100 pixels in height
# also specifies the rectangle color and the fill color
draw_filled_rectangle(board,-100,50,200,100,5,"blue","green")
turtle.done()

The following the sample output from the program showing a filled rectangle,

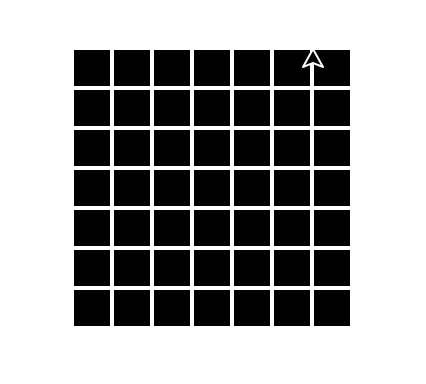
The following program uses looping to draw a two dimensional matrix of identical black squares. Note that we are using black as fill color and white as the stroke color for the rectangles.

import turtle
turtle.setup(500,500)
board = turtle.Turtle()

# draws a rectangle given top left position of a rectangle
def draw_filled_rectangle(board,x,y,width,height,size,color,fill):
  board.fillcolor(fill)
  board.pencolor(color)
  board.pensize(size)
  board.setheading(0)

  board.begin_fill()
  board.up()
  board.goto(x,y)
  board.down()
  # draw top
  board.forward(width)
  # draw right
  board.right(90)
  board.forward(height)
  # draw bottom
  board.right(90)
  board.forward(width)
  # draw left
  board.right(90)
  board.forward(height)
  board.end_fill()

# draw a 7x7 matrix of black squares
for x in range(1,8):
  for y in range(1,8):
    draw_filled_rectangle(board,-200+x*20,y*20,20,20,2,"white","black")

turtle.done()

The following the sample output of 7x7 matrix of black squares from the python turtle program,

How to Draw Circles Using Python Turtle

Python contains an interesting drawing module called Turtle. This module is available as part of the standard python distribution. Turtle consists of a number of graphics operations modelled after pen drawing. In this article I will show you how we can use the turtle commands to draw circle based shapes.

How to Draw a Simple Circle Using Python Turtle

The following python script creates a simple circle with default color at the center of the turtle canvas. We have defined the turtle canvas with a width of 800 pixels and a height of 600 pixels. We then draw a circle of radius 100 pixels in the middle of the canvas. Note that the bottom of the circle is placed in the middle of the canvas.

import turtle

turtle.setup(800,600)
board = turtle.Turtle()

board.penup()
board.setpos(0,0)
board.pendown()
board.circle(100)

turtle.done()

How to Draw a Face Using Python Turtle

The following python script draws the shape of a face using the turtle commands. We have organized the code in functions so that each section of the drawing is separate. Note that we are resetting the direction of the pen after drawing part of a circle in the draw_lip functions.

import turtle
turtle.setup(800,600)
board = turtle.Turtle()

def draw_face():
  board.penup()
  board.setpos(0,0)
  board.pendown()
  board.circle(100)

def draw_left_eye():
  board.penup()
  board.setpos(-50,100)
  board.pendown()
  board.circle(25)

def draw_right_eye():
  board.penup()
  board.setpos(50,100)
  board.pendown()
  board.circle(25)

def draw_right_lip():
  board.penup()
  board.setpos(0,25)
  board.pendown()
  board.circle(100,45)
  board.setheading(0)

def draw_left_lip():
  board.penup()
  board.setpos(0,25)
  board.pendown()
  board.circle(100,-45)
  board.setheading(0)

draw_face()
draw_left_eye()
draw_right_eye()
draw_left_lip()
draw_right_lip()

board.penup()
board.setpos(400,400)
turtle.done()

How to Draw Tangent Circles Using Python Turtle

The following python program creates tangent circles at the middle of the canvas. We use a loop to generate the circles and for each iteration we just change the radius of the circle.

import turtle
turtle.setup(800,600)
board = turtle.Turtle()

for i in range(1,20):
  board.circle(i*10)

turtle.done()

How to Draw Concentric Circles Using Python Turtle

The following python program creates concentric circles at the middle of the canvas. We use a loop to generate the circles and for each iteration we change the y location and the radius of the circle.

import turtle
turtle.setup(800,600)
board = turtle.Turtle()

for i in range(1,20):
  board.circle(i*10)
  board.penup()
  board.sety(-i*10)
  board.pendown()

turtle.done()

How to Draw Olympics Logo Using Python Turtle

The following python program creates the olympics logo using the the turtle package. It also demonstrates the use of pen color and pen size in drawing shapes.

import turtle
turtle.setup(800,600)
board = turtle.Turtle()


circle_positions = [(-120,0,"blue"), (0,0,"black"), (120,0,"red"),
                    (-60,-60,"yellow"), (60,-60,"green")]

for pos in circle_positions:
  board.penup()
  board.setpos(pos[0],pos[1])
  board.pencolor(pos[2])
  board.pensize(5)
  board.pendown()
  board.circle(50)

turtle.done()