Java Decimal to Hexadecimal Conversion

In Mathematics, we use various positional numbering schemes for representing numbers. We are familiar with decimal numbering system which uses a base of 10. Two other commonly used numbering systems in computing are hexadecimal (base 16) and binary (base 2).

Conversion of decimal value to hex string requires the following steps,

  • Find the reminder of the decimal value when it is divided by 16.
  • Find the corresponding hex character to get the right most character of the hex result
  • Divide the decimal value by 16 and use it as the decimal value for the next iteration
  • Repeat the steps to get each character in the hex result

The following program uses the above algorithm to convert decimal value to its corresponding hexadecimal string,

/**
 * Converts a decimal number to a hexadecimal string 
 */
public class DecimalToHex {
    public static String HEX_CHARACTERS="0123456789ABCDEF";
    
    public static void main(String[] args) {
        DecimalToHex dh = new DecimalToHex();
        int decValue = 922;
        String hex = dh.dec2hex(decValue);
        System.out.println("Hexadecimal value of "+decValue+" is "+hex);
    }

    /**
     * 
     * @param decValue decimal value to be converted
     * @return hexadecimal string representation
     */
    private String dec2hex(int decValue) {
        if(decValue==0) return "0";
        String hexVal="";
        while(decValue > 0) {
            // find right most digit in hex
			int digit = decValue%16;
            hexVal = HEX_CHARACTERS.charAt(digit)+hexVal;
			
			decValue = decValue/16;
        }
        return hexVal;
    }
}

Java Hexadecimal to Decimal Conversion

In Mathematics, we use various positional numbering schemes for representing numbers. We are familiar with decimal numbering system which uses a base of 10. Two other commonly used numbering systems in computing are hexadecimal (base 16) and binary (base 2).

When we represent a number in hexadecimal system, we use the symbols 0 to 9 and letters A, B, C, D, E and F. Decimal numbering system uses symbols 0 to 9. A value D in hexadecimal corresponds to the decimal value of 13. Following are some of the examples of hexadecimal to decimal conversion,

1AF = 1*16*16 + 10*16 + 15 = 256 + 160 + 15 = 431
224B = 2*16*16*16 + 2*16*16 + 4*16 + 11 = 8192 + 512 + 64 + 11 = 8779

The conversion involves the following steps,

  • Find the decimal value of each digit in hexadecimal string
  • Multiply each decimal value with 16 raised to the power of the position of the digit
  • Add all the values to get the equivalent decimal value

The following program uses the above algorithm to convert hexadecimal string to its corresponding decimal value,

/**
 * This program converts a hexadecimal value to its corresponding decimal value
 * @author QPT
 */
public class HexToDecimal {
    public static String HEX_CHARACTERS="0123456789ABCDEF";
    
    public static void main(String[] args) {
        HexToDecimal hd = new HexToDecimal();
        String hexValue = "87BBDF";
        int dec = hd.hex2dec(hexValue);
        System.out.println("Decimal value of "+hexValue+" is "+dec);
    }
    
    /**
     * 
     * @param hexValue hex value for decimal conversion
     * @return decimal value
     */
    private int hex2dec(String hexValue) {
        hexValue = hexValue.toUpperCase();
        int decimalResult = 0;
        for(int i=0;i<hexValue.length();i++) {
            char digit = hexValue.charAt(i);
            int digitValue = HEX_CHARACTERS.indexOf(digit);
            decimalResult = decimalResult*16+digitValue;
        }
        return decimalResult;
    }
}

Creating Static ListView in Android

Listviews in Android is a very versatile UI component for handling display of a list of items. One common use case is to create a simple fixed menu of items from which user can select an option. This tutorial explains the step by step procedure for creating a list view with static items. In our app, we would show a list of popular mobile devices.

Our sample app will follow standard architecture involving a single activity and a fragment. Our fragment will be responsible for rendering the screen. We will also use the AppCompat library for supporting older Android devices.

This tutorial assumes that you are using Android Studio 1.0 or later. From Android studio, create a new project. Select Android 2.3 as the minimum SDK supported by the project. Also ensure that "Add No Activity" is selected in the third screen. We will add our Activity and Fragment manually. For the example project, I have used the following values.

  • Application Name: StaticListView
  • Package Name: com.quickprogrammingtips.examples

Since this is an example application, all Java files would be created under the package com.quickprogrammingtips.examples. In your real application, you might want to organize class files under different packages based on functionality. For example, we might have com.quickprogrammingtips.examples.activity package for storing all our activities, com.quickprogrammingtips.examples.fragment package for storing all our fragments, etc.

Step 1: Create a simple layout for our list view (staticlistviewmain.xml)

From Android Studio, create a folder named "layout" inside the "res" folder. Right click and add a new "Layout resource file". Name the file as staticlistviewmain.xml. Replace the content with the following. In the layout, we have added a single ListView named "listView".

<?xml version="1.0" encoding="utf-8"?>
<LinearLayout xmlns:android="http://schemas.android.com/apk/res/android"
    android:orientation="vertical" android:layout_width="match_parent"
    android:layout_height="match_parent">

    <ListView
        android:layout_width="match_parent"
        android:layout_height="wrap_content"
        android:id="@+id/listView" />
</LinearLayout>

Step 2: Create a simple fragment (StaticListViewFragment.java)

From Android Studio, create a new Java class file under the com.quickprogrammingtips.examples package. Name it as StaticListViewFragment. Replace the code with the following,

package com.quickprogrammingtips.examples;

import android.os.Bundle;
import android.support.annotation.Nullable;
import android.support.v4.app.Fragment;
import android.view.LayoutInflater;
import android.view.View;
import android.view.ViewGroup;
import android.widget.ArrayAdapter;
import android.widget.ListView;


public class StaticListViewFragment extends Fragment {

    private static String[] MOBILE_MODELS = {"iPhone 6","Nexus 6","Moto G","HTC One","Galaxy S5","Sony Xperia Z2","Lumia 830","Galaxy Grand 2"};

    public static StaticListViewFragment newInstance() {
        Bundle args = new Bundle();
        StaticListViewFragment fragment = new StaticListViewFragment();
        fragment.setArguments(args);
        return fragment;
    }

    @Override
    public View onCreateView(LayoutInflater inflater, @Nullable ViewGroup container, @Nullable Bundle savedInstanceState) {
        View mainView = inflater.inflate(R.layout.staticlistviewmain, container, false);
        ListView listView = (ListView) mainView.findViewById(R.id.listView);

        listView.setAdapter(new ArrayAdapter<String>(getActivity(),android.R.layout.simple_list_item_1,MOBILE_MODELS));
        return mainView;
    }
}

There are a number of important things going on in the fragment. First we ensure that our class inherit from android.support.v4.app.Fragment. This ensures that our fragments work on older devices. If you don’t need old device support you can use android.app.Fragment.

Also we have a static newInstance() method which will create an instance of this fragment and return it. This pattern is required to ensure that if a fragment has parameters, they are properly initialized using fragment arguments. In our example, there are no fragment arguments. If you had one, you will pass it to newInstance() method which in turn will add it to the Bundle object. This ensures that fragment parameters are preserved when they are automatically recreated during activity destruction cycle (for example, due to rotation).

Since we have a static fixed list of items, we have used a String array. In onCreateView() we populate our list view using this array. Android has something called adapters which are used to supply data to the list view. Android also provides some default adapters one of which is ArrayAdapter.

Android also has a number of default system wide layouts which can be directly used. In our example we have used android.R.layout.simple_list_item_1 which is a platform level layout containing just one TextView. ArrayAdapter ensures that the String array elements are displayed using this TextView.If you want to customize appearance, You can pass your own layout which contains a TextView with id text1.

Step 3: Create a simple activity (StaticListViewActivity.java)

From Android Studio, create a new Java class file under the com.quickprogrammingtips.examples package. Name it as StaticListViewActivity. Replace the code with the following,

package com.quickprogrammingtips.examples;

import android.os.Bundle;
import android.support.v4.app.FragmentManager;
import android.support.v4.app.FragmentTransaction;
import android.support.v7.app.ActionBarActivity;

public class StaticListViewActivity extends ActionBarActivity {


    @Override
    protected void onCreate(Bundle savedInstanceState) {
        super.onCreate(savedInstanceState);

        // create our UI using a fragment
        FragmentManager fragmentManager = getSupportFragmentManager();
        if (fragmentManager.findFragmentById(android.R.id.content) == null) {
            StaticListViewFragment fragment = StaticListViewFragment.newInstance();
            FragmentTransaction ft = fragmentManager.beginTransaction();
            ft.replace(android.R.id.content, fragment);
            ft.commit();
        }
        ((ActionBarActivity)this).getSupportActionBar().setDisplayShowHomeEnabled(true);
    }
}

In the onCreate() method of the activity a fragment is instantiated which in turn will create our user interface. Also note the use of AppCompat (v7/v4) library classes for supporting older Android versions.

Usually fragments are added to an existing layout. But in our example we have used android.R.id.content which is a system level id for the default root view of an activity. Another approach would be to use setContentView() method in the activity to set a custom layout and then use id of an element inside that layout to embed the fragment layout.

Note that our activity extends from android.support.v7.app.ActionBarActivity. This enables action bar for the screen which is now almost a default standard in Android.

We also check whether the fragment is already present before adding it. This is required to handle device rotation when the fragment is recreated automatically and hence we don’t want to add it again!

Also note the use of getSupportActionBar() to support older devices. You need to be on the look out for methods and classes in AppCompat whenever you are writing an app with older device support.

Step 4: Add activity to manifest

Finally add our Activity reference in the manifest file (AndroidManifest.xml).

<manifest xmlns:android="http://schemas.android.com/apk/res/android"
    package="com.quickprogrammingtips.examples">

    <application android:allowBackup="true" android:label="@string/app_name"
        android:icon="@drawable/ic_launcher" android:theme="@style/AppTheme">

        <activity android:name=".StaticListViewActivity">
            <intent-filter>
                <action android:name="android.intent.action.MAIN" />
                <category android:name="android.intent.category.LAUNCHER" />
            </intent-filter>
        </activity>

    </application>

</manifest>

Step 5: Run the application

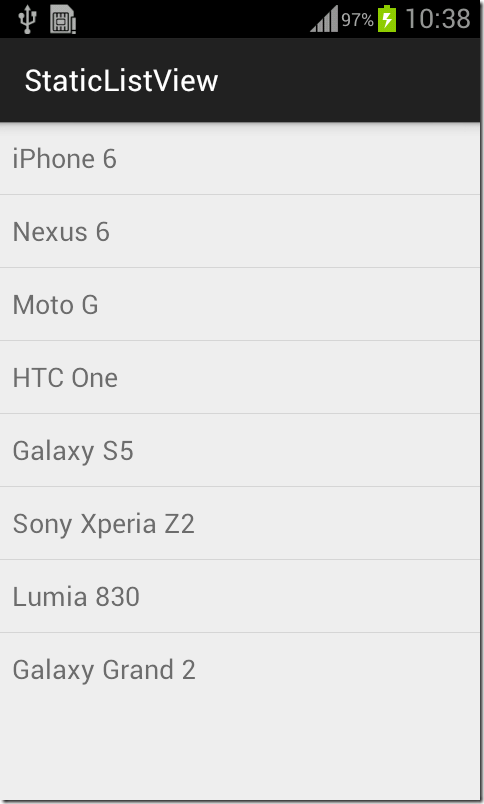
Run the application and you will see a simple list view with a list of popular mobile devices. It will also have a default action bar on the top.
Difference between HttpSessionAttributeListener and HttpSessionBindingListener

Servlet API in Java EE defines different types of event listener interfaces for watching changes in HttpSession. Two of these interfaces namely HttpSessionAttributeListener and HttpSessionBindingListener cause confusion among programmers. These interfaces enable 2 different ways of handling session changes. This article explains each listener with an example.

HttpSessionAttributeListener Interface
A class can implement HttpSessionAttributeListener interface to listen for attributes being added or removed from a session. This class can be configured as a listener using the listener tag in web.xml deployment descriptor or using @WebListener annotation in the class file. This interface has 3 callback methods - attributeAdded, attributeDeleted and attributeReplaced.

HttpSessionBindingListener Interface
An object which is added as session attribute can implement HttpSessionBindingListener interface. This tells the servlet container to call the HttpSessionBindingListener methods defined in the object whenever the object instance is added or removed from session. This is useful when the object itself needs to known when it is being added or removed from session. There is no need to mark this object as listener object using annotations or web.xml entry. It has 2 callback methods - valueBound, valueUnbound.

HttpSessionAttributeListener and HttpSessionBindingListener - Sample Program
The following sample servlet program illustrates the difference between HttpSessionAttributeListener and HttpSessionBindingListener.

The following sample servlet (ListenerDemoServlet) adds multiple attributes to session. One of them (MyObjectInSession) implements HttpSessionBindingListener. Whenever an attribute is added, the configured listener MySessionAttributeListener (which implements HttpSessionAttributeListener) is called. When MyObjectSession is added or removed, container calls MySessionAttributeListener methods AND HttpSessionBindingListener methods defined in MyObjectInSession.

ListenerDemoServlet.java

import javax.servlet.http.HttpServletRequest;
import javax.servlet.http.HttpServletResponse;
import javax.servlet.http.HttpSession;

@WebServlet(name = "ListenerDemoServlet", urlPatterns = {"/ListenerDemoServlet"})
public class ListenerDemoServlet extends HttpServlet {

    @Override
    protected void doGet(HttpServletRequest request, 
                         HttpServletResponse response)
            throws ServletException, IOException {
        HttpSession session = request.getSession();
        session.setAttribute("stringvalue1", "hello");
        session.setAttribute("stringvalue2", "world");
        session.setAttribute("objvalue1", new MyObjectInSession());
    }

}

MyObjectInSession.java

package com.quickprogrammingtips.sample.articleproject;

import javax.servlet.http.HttpSessionBindingEvent;
import javax.servlet.http.HttpSessionBindingListener;

// the listener annotation is optional since container infers it from the interface
public class MyObjectInSession implements HttpSessionBindingListener{
    public MyObjectInSession() {
    }
    @Override
    public void valueBound(HttpSessionBindingEvent event) {
        System.out.println("My Object is added to session: Key is :" 
                           + event.getName());
    }

    @Override
    public void valueUnbound(HttpSessionBindingEvent event) {
    }
}

MySessionAttributeListener.java

package com.quickprogrammingtips.sample.articleproject;

import javax.servlet.annotation.WebListener;
import javax.servlet.http.HttpSessionAttributeListener;
import javax.servlet.http.HttpSessionBindingEvent;

// The following annotation marks this class as a listener and container automatically registers it.
@WebListener 
public class MySessionAttributeListener implements HttpSessionAttributeListener {

    @Override
    public void attributeAdded(HttpSessionBindingEvent event) {
       System.out.println("Attribute added is "+event.getName());
    }

    @Override
    public void attributeRemoved(HttpSessionBindingEvent event) {
    }

    @Override
    public void attributeReplaced(HttpSessionBindingEvent event) {
       System.out.println("Attribute replaced is "+event.getName());
    }
}

When the servlet is run, the following output is seen on the application server console,

Attribute added is stringvalue1
Attribute added is stringvalue2
My Object is added to session: Key is :objvalue1
Attribute added is objvalue1

Summary
HttpSessionAttributeListener is a generic listener for the session and is called whenever any attribute value is added or removed from a session. This enables us to keep track of all the objects that is added or removed from a session. This listener lets us know whether an attribute is added, removed or updated.

HttpSessionBindingListener is a callback interface that can be implemented by classes which are intended to be added to session. Whenever an object implementing HttpSessionBindingListener is added or removed to session, the callback methods defined on the object is called. Unlike HttpSessionAttributeListener it doesn't differentiate between adding or updating an attribute.

The key difference is between HttpSessionAttributeListener and HttpSessionBindingListener is that HttpSessionAttributeListener listens for any attribute change in session while an object implementing HttpSessionBindingListener gets notified whenever the same object is added/removed from session.

Sum of Digits of a Number in Objective-C

The following Objective-C program prints sum of digits of a number entered by user. This program will only compile in latest compilers as it uses ARC paradigm. The program uses scanf c function to read user input.

// Print sum of digits of a user entered number
#import <foundation foundation.h>

int main(int argc, const char * argv[])
{

    @autoreleasepool {
        int number,digit,sum=0, temp;

        NSLog(@"Enter a number:");
        scanf("%i", &number);
        temp = number;
        
        while(temp > 0) {
            digit = temp%10;
            sum += digit;
            temp = temp/10;
        }
        NSLog(@"Sum of digits of %i = %i",number,sum);
        
    }
    return 0;
}