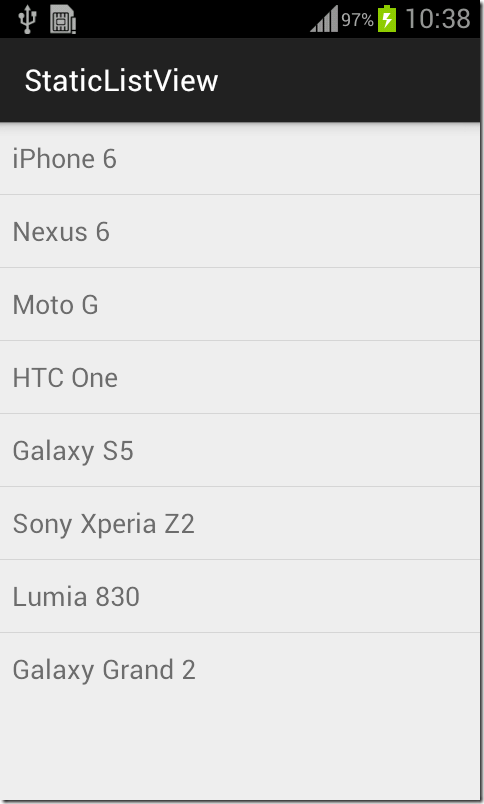
Creating Static ListView in Android
Listviews in Android is a very versatile UI component for handling display of a list of items. One common use case is to create a simple fixed menu of items from which user can select an option. This tutorial explains the step by step procedure for creating a list view with static items. In our app, we would show a list of popular mobile devices.
Our sample app will follow standard architecture involving a single activity and a fragment. Our fragment will be responsible for rendering the screen. We will also use the AppCompat library for supporting older Android devices.
This tutorial assumes that you are using Android Studio 1.0 or later. From Android studio, create a new project. Select Android 2.3 as the minimum SDK supported by the project. Also ensure that "Add No Activity" is selected in the third screen. We will add our Activity and Fragment manually. For the example project, I have used the following values.
- Application Name: StaticListView
- Package Name: com.quickprogrammingtips.examples
Since this is an example application, all Java files would be created under the package com.quickprogrammingtips.examples. In your real application, you might want to organize class files under different packages based on functionality. For example, we might have com.quickprogrammingtips.examples.activity package for storing all our activities, com.quickprogrammingtips.examples.fragment package for storing all our fragments, etc.
Step 1: Create a simple layout for our list view (staticlistviewmain.xml)
From Android Studio, create a folder named "layout" inside the "res" folder. Right click and add a new "Layout resource file". Name the file as staticlistviewmain.xml. Replace the content with the following. In the layout, we have added a single ListView named "listView".
<?xml version="1.0" encoding="utf-8"?>
<LinearLayout xmlns:android="http://schemas.android.com/apk/res/android"
    android:orientation="vertical" android:layout_width="match_parent"
    android:layout_height="match_parent">

    <ListView
        android:layout_width="match_parent"
        android:layout_height="wrap_content"
        android:id="@+id/listView" />
</LinearLayout>
Step 2: Create a simple fragment (StaticListViewFragment.java)
From Android Studio, create a new Java class file under the com.quickprogrammingtips.examples package. Name it as StaticListViewFragment. Replace the code with the following,
package com.quickprogrammingtips.examples;

import android.os.Bundle;
import android.support.annotation.Nullable;
import android.support.v4.app.Fragment;
import android.view.LayoutInflater;
import android.view.View;
import android.view.ViewGroup;
import android.widget.ArrayAdapter;
import android.widget.ListView;


public class StaticListViewFragment extends Fragment {

    private static String[] MOBILE_MODELS = {"iPhone 6","Nexus 6","Moto G","HTC One","Galaxy S5","Sony Xperia Z2","Lumia 830","Galaxy Grand 2"};

    public static StaticListViewFragment newInstance() {
        Bundle args = new Bundle();
        StaticListViewFragment fragment = new StaticListViewFragment();
        fragment.setArguments(args);
        return fragment;
    }

    @Override
    public View onCreateView(LayoutInflater inflater, @Nullable ViewGroup container, @Nullable Bundle savedInstanceState) {
        View mainView = inflater.inflate(R.layout.staticlistviewmain, container, false);
        ListView listView = (ListView) mainView.findViewById(R.id.listView);

        listView.setAdapter(new ArrayAdapter<String>(getActivity(),android.R.layout.simple_list_item_1,MOBILE_MODELS));
        return mainView;
    }
}
There are a number of important things going on in the fragment. First we ensure that our class inherit from android.support.v4.app.Fragment. This ensures that our fragments work on older devices. If you don’t need old device support you can use android.app.Fragment.
Also we have a static newInstance() method which will create an instance of this fragment and return it. This pattern is required to ensure that if a fragment has parameters, they are properly initialized using fragment arguments. In our example, there are no fragment arguments. If you had one, you will pass it to newInstance() method which in turn will add it to the Bundle object. This ensures that fragment parameters are preserved when they are automatically recreated during activity destruction cycle (for example, due to rotation).
Since we have a static fixed list of items, we have used a String array. In onCreateView() we populate our list view using this array. Android has something called adapters which are used to supply data to the list view. Android also provides some default adapters one of which is ArrayAdapter.
Android also has a number of default system wide layouts which can be directly used. In our example we have used android.R.layout.simple_list_item_1 which is a platform level layout containing just one TextView. ArrayAdapter ensures that the String array elements are displayed using this TextView.If you want to customize appearance, You can pass your own layout which contains a TextView with id text1.
Step 3: Create a simple activity (StaticListViewActivity.java)
From Android Studio, create a new Java class file under the com.quickprogrammingtips.examples package. Name it as StaticListViewActivity. Replace the code with the following,
package com.quickprogrammingtips.examples;

import android.os.Bundle;
import android.support.v4.app.FragmentManager;
import android.support.v4.app.FragmentTransaction;
import android.support.v7.app.ActionBarActivity;

public class StaticListViewActivity extends ActionBarActivity {


    @Override
    protected void onCreate(Bundle savedInstanceState) {
        super.onCreate(savedInstanceState);

        // create our UI using a fragment
        FragmentManager fragmentManager = getSupportFragmentManager();
        if (fragmentManager.findFragmentById(android.R.id.content) == null) {
            StaticListViewFragment fragment = StaticListViewFragment.newInstance();
            FragmentTransaction ft = fragmentManager.beginTransaction();
            ft.replace(android.R.id.content, fragment);
            ft.commit();
        }
        ((ActionBarActivity)this).getSupportActionBar().setDisplayShowHomeEnabled(true);
    }
}
In the onCreate() method of the activity a fragment is instantiated which in turn will create our user interface. Also note the use of AppCompat (v7/v4) library classes for supporting older Android versions.
Usually fragments are added to an existing layout. But in our example we have used android.R.id.content which is a system level id for the default root view of an activity. Another approach would be to use setContentView() method in the activity to set a custom layout and then use id of an element inside that layout to embed the fragment layout.
Note that our activity extends from android.support.v7.app.ActionBarActivity. This enables action bar for the screen which is now almost a default standard in Android.
We also check whether the fragment is already present before adding it. This is required to handle device rotation when the fragment is recreated automatically and hence we don’t want to add it again!
Also note the use of getSupportActionBar() to support older devices. You need to be on the look out for methods and classes in AppCompat whenever you are writing an app with older device support.
Step 4: Add activity to manifest
Finally add our Activity reference in the manifest file (AndroidManifest.xml).
<manifest xmlns:android="http://schemas.android.com/apk/res/android"
    package="com.quickprogrammingtips.examples">

    <application android:allowBackup="true" android:label="@string/app_name"
        android:icon="@drawable/ic_launcher" android:theme="@style/AppTheme">

        <activity android:name=".StaticListViewActivity">
            <intent-filter>
                <action android:name="android.intent.action.MAIN" />
                <category android:name="android.intent.category.LAUNCHER" />
            </intent-filter>
        </activity>

    </application>

</manifest>
Step 5: Run the application
Run the application and you will see a simple list view with a list of popular mobile devices. It will also have a default action bar on the top.
