Introduction
Struts 2 is an excellent MVC Web application framework for developing enterprise Java web applications. It enables rapid development of Web applications and handles most of the plumbing required in large Web applications. This tutorial shows how NetBeans IDE can be used to build Struts 2 applications.
Usually Struts2 applications are developed as Maven projects. However in this tutorial I will be demonstrating how to setup the Struts 2 project from scratch as it helps a beginner in understanding the "nuts & bolts" of Struts 2 development.
Pre-requisites
Following tools are required to start Struts 2 web application development using NetBeans,
- Java SDK - Download and install Java SDK from Oracle site. For this tutorial, I used Java 6, update 26.
- NetBeans - Download and install NetBeans IDE from here. Download either the "Java EE" edition or the "All" edition since we need the bundled Tomcat server for running Struts 2 applications. For this tutorial, I used NetBeans 7.1.1.
- Struts 2 Library Files - Download and extract Struts 2 binary distribution files from here. I recommend downloading the "Full Distribution" zip file containing all dependency jar files. However the "Essential Dependencies Only" zip file (which is much smaller than full distribution) is also sufficient for the sample application we are going to build. For this tutorial, I used Struts 2.3.1.2.
Creating a Struts 2 Application in NetBeans
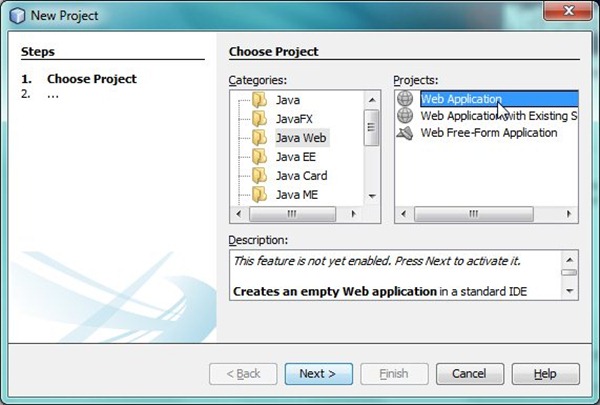
A Struts 2 application is an ordinary Java Web application with a set of additional libraries. From NetBeans IDE Click on File => New Project. From the New Project window, select Java Web Application and click on Next as shown below,

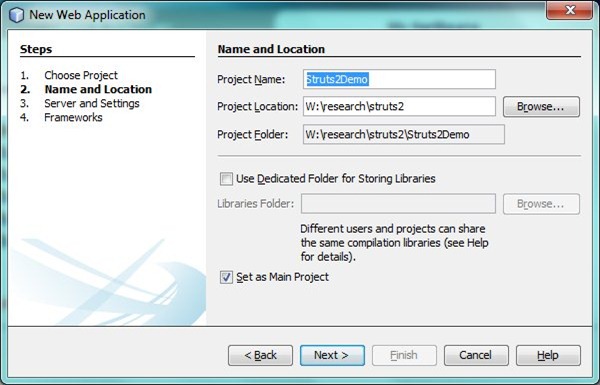
Enter the Project Name as Struts2Demo and select a folder for your project as shown below and click on Next.

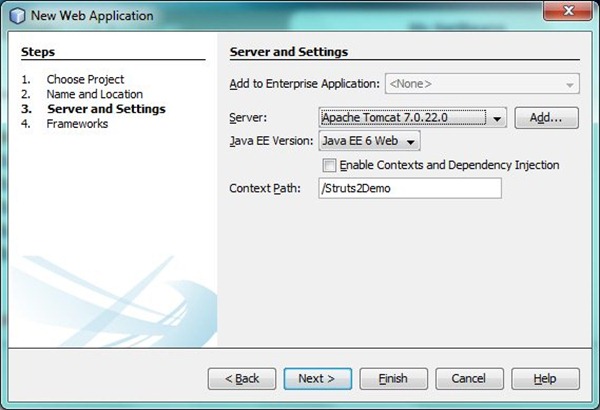
Select the server as Apache Tomcat and leave the defaults for other options as shown below. Click on Finish to create the Web application.

By default, NetBeans creates simple index.jsp as part of the Web application which prints "Hello World!" on the browser window. Select the menu Run => Run Main Project (F6) to see the application up and running on Tomcat. The default URL for accessing the application is http://localhost:8084/Struts2Demo/.
The default project structure of the Web application in NetBeans is shown below,

Adding Struts 2 Libraries to NetBeans Web Application
Before we can convert our simple Web application to a Struts2 application, we need to add the necessary Struts2 libraries to the NetBeans project. The minimum set of Struts2 libraries needed for our tutorial application is given below (note that the version numbers may be different if you are using a different version of Struts2),
- struts2-core-2.3.1.2.jar - This contains all the Struts2 core classes
- ognl-3.0.4.jar - OGNL library for using OGNL expression language
- xwork-core-2.3.1.2.jar - Struts 2 uses XWork MVC library
- freemarker-2.3.18.jar - UI templates are written in freemarker
- javassist-3.11.0.GA.jar - Essential dependency of Struts 2
- commons-io-2.0.1.jar - Essential dependency of Struts 2
- commons-filleupload-1.2.2.jar - Essential dependency of Struts 2
- commons-lang-2.5.jar - Essential dependency of Struts 2
From the NetBeans project, right click on Libraries and then click on Add JAR/Folder option. Add all the jars given in the above list from the downloaded Struts2 zip file. After adding all the jars the Libraries section of the NetBeans project should look like the following.

Configuring Struts 2 in a Web application
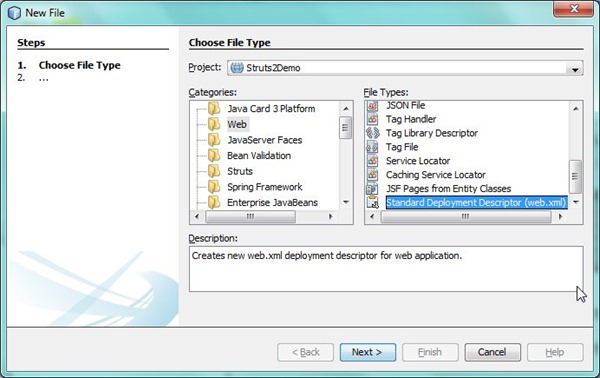
The next step in configuring Struts2 Web application is to enable the Struts2 MVC framework in the HTTP request processing. For this we will first configure a Struts2 class (org.apache.struts2.dispatcher.ng.filter.StrutsPrepareAndExecuteFilter) as a servlet filter by modifying the web.xml. If you don't have web.xml under the Configuration Files section of your NetBeans, you can add it by selecting the menu File => New File => Web => Standard Deployment Descriptor (web.xml) as shown below.

The modified web.xml is given below,
<?xml version="1.0" encoding="UTF-8"?>

<web-app xmlns="http://java.sun.com/xml/ns/javaee"
         xmlns:xsi="http://www.w3.org/2001/XMLSchema-instance"
         xsi:schemaLocation="http://java.sun.com/xml/ns/javaee http://java.sun.com/xml/ns/javaee/web-app_3_0.xsd"
         version="3.0">
    <session-config>
        <session-timeout>
            30
        </session-timeout>
    </session-config>

    <display-name>Struts2 Demo App</display-name>
    <filter>
        <filter-name>struts2</filter-name>
        <filter-class>org.apache.struts2.dispatcher.ng.filter.StrutsPrepareAndExecuteFilter</filter-class>
    </filter>

    <filter-mapping>
        <filter-name>struts2</filter-name>
        <url-pattern>/*</url-pattern>
    </filter-mapping>
</web-app>
The above configuration in web.xml ensures that all the requests to the Web application will be routed through the Struts 2 StrutsPrepareAndExecuteFilter class. This will act as a single controller dispatching requests to Struts 2 request processors (action classes) based on the request properties.
Converting Hello World Web Application to Struts 2 MVC Web Application
MVC stands for Model-View-Controller and it is a design paradigm which helps in building and maintaining large Web applications. The simplest definition is - A user request is handled by a controller which in turn gets data from model and forwards it to the view for display.
Let us modify the "Hello World!" application to use Struts 2 MVC architecture to output the "Hello World!" message. The overall architecture of our Hello World Struts 2 MVC application is given below,

This means that we need the following components,
- Model - A class which supplies the data needed for the application. In this demo app, the data supplied is the "Hello World!" message. We will write a simple Message class (Message.java) to return the message.
- View - A view element which displays the data. In this demo app, we will write a JSP file (message.jsp) which will display the message returned by the Model class.
- Controller - A controller class which will respond to user URL request. The controller will coordinate the actions of Model and the View. We will write a Struts 2 action class (HelloWorld.java) for this.
- Struts 2 Configuration - Struts 2 needs to be told about various components of the application. This can be configured in an xml file (struts.xml) or we can use a combination of standard naming conventions and annotations. This tutorial will stick to the traditional way of configuring Struts 2 using struts.xml. For the first time user, conventions and annotations may seem like magic!
For a simple application like "Hello World!" this may seem like an overkill. However for large enterprise Web applications such separation of concerns is very essential for the robustness, reliability, extensibility and maintainability of the application.
Let us first create our model class which holds the "Hello World!" message. In real applications, these model objects will correspond to persistent data. In this simple example we will be directly using the model object from the controller. However in real applications, we will create a business layer which will return the data. Note that the Message class is organized under model java package.
Message.java (model)
package model;

public class Message {
    private String message = "Hello World!";

    public String getMessage() {
        return message;
    }

    public void setMessage(String message) {
        this.message = message;
    }
}
Next we will create an action class (controller) which will respond to the user request. The controller in this case will create/retrieve the message and would pass it along to the view.
Typically action classes handling user requests extend from ActionSupport class. The request processing will be done by the overridden execute() method which is automatically called by the framework. Note that the HelloWorld.java (action class) is organized under the controller java package.
HelloWorld.java (controller action class)
package controller;

import com.opensymphony.xwork2.ActionSupport;
import model.Message;

public class HelloWorld extends ActionSupport {
    private Message message;

    @Override
    public String execute() {
        setMessage(new Message()); // get data from model
        return SUCCESS;
    }

    public Message getMessage() {
        return message;
    }

    public void setMessage(Message message) {
        this.message = message;
    }

}
We will now create the user interface. In this demo example we will use the JSP technology for rendering the user interface. Struts 2 supports other view technologies such as freemarker templates and velocity templates.
message.jsp (View)
<%@ taglib prefix="s" uri="/struts-tags" %>
<%@page contentType="text/html" pageEncoding="UTF-8"%>
<!DOCTYPE html>
<html>
    <head>
        <title><s:property value="message.message" /></title>
    </head>
    <body>
        <h1><s:property value="message.message" /></h1>
    </body>
</html>
Note the use of custom tags in the JSP. These custom tags are provided by Struts 2. The Struts 2 custom tags use the OGNL expressions to refer to the data exposed by the controller class. This is achieved by the Struts 2 framework by automatically exposing the member variables of the controller class to the tag libraries.
In the above example, Struts 2 property tag refers to the value message.message. The framework automatically translates this to the following call on the controller (action class) by convention.
HelloWorld.getMessage().getMessage()
Since we have already prepared the Message object in the HelloWorld controller, we get the "Hello World!" message printed on the screen.
Finally we need to inform Struts 2 framework about our controllers, action classes and view files. This can be configured in struts.xml. This file needs to be located at the root of the source tree (it needs to be in the classpath).
struts.xml (Struts 2 configuration)
<!DOCTYPE struts PUBLIC
    "-//Apache Software Foundation//DTD Struts Configuration 2.0//EN"
    "http://struts.apache.org/dtds/struts-2.0.dtd">
<struts>
    <package name="struts2demo" extends="struts-default">
        <action name="HelloWorld" class="controller.HelloWorld">
            <result>/message.jsp</result>
        </action>
        <!-- Add your actions here -->
    </package>
</struts>
We have specified an action named HelloWorld and indicated which class file needs to be invoked for the action request. By convention, a URL request to HelloWorld.action is mapped to the action name HelloWorld. Also we have configured a result which points to our view component (message.jsp). Struts 2 framework will forward the request to message.jsp when it encounters return SUCCESS in the controller class (HelloWorld.java).
The complete structure of the NetBeans Struts 2 project should look like the following,

Run the project from NetBeans. To see the application in action, enter the following URL in the browser,
http://localhost:8084/Struts2Demo/HelloWorld.action
If everything went well, you should see the following screen!

Troubleshooting Struts 2 Application Errors
Following are some of the common errors encountered by beginners when working with the above sample program.
java.lang.IllegalStateException: Must have the StrutsPrepareFilter execute before this one
This is due to the use of a wrong filter in the web.xml. Some of the obsolete Struts2 documentation uses org.apache.struts2.dispatcher.ng.filter.StrutsExecuteFilter as the filter class in web.xml. This is no longer a valid filter class, change this to org.apache.struts2.dispatcher.ng.filter.StrutsPrepareAndExecuteFilter.
java.lang.NoClassDefFoundError: org/apache/commons/io/FileUtils
This error indicates that you don't have the commons io library in the Web application library folder. Add commons-io-2.0.1.jar to the libraries folder in NetBeans.
java.lang.NoClassDefFoundError: org/apache/commons/lang/StringUtils
This error indicates that common lang dependent library is missing. Add commons-lang-2.5.jar to the libraries folder in NetBeans.
java.lang.NoClassDefFoundError: org/apache/commons/fileupload/RequestContext
This error indicates that common file upload dependent library is missing in the project. Add commons-fileupload-1.2.2.jar to the application library folder.
java.lang.ClassNotFoundException: javassist.ClassPool
This error indicates that Javassist library is missing in the project. Add javassist-3.11.0.GA.jar to the application library folder.
java.lang.ClassNotFoundException: ognl.NullHandler
This error indicates that OGNL library is missing in the project. Add ognl-3.0.4.jar to the application library folder.
java.lang.ClassNotFoundException: freemarker.template.TemplateException
This error indicates that freemarker library is missing in the project. Add freemarker-2.3.18.jar to the Web application library folder.
Download NetBeans Struts 2 Application
You can download the above NetBeans Struts 2 demo application from here. Please note that to keep the download size small, I have removed all the library files from the project. You will need to download Struts 2 libraries separately and add them to the project before you can run the application.
If you have questions or feedback, please let me know by commenting below. I will try to answer them here.


